Machine Onchain steps
Machine Onchain steps
Method 1: Binding via web wallet
0. Ready to work
Make sure DBC client is installed on the machine.
Before bonding GPU Machine online, please make sure you have enough balance in your wallet. (Each GPU need to stake 1000 DBC).
Stash account binding control account
1.1 Description:
For the safety of your account funds, we strongly recommend using a multi-signature account as a capital account. For multi-signature accounts, please go to https://github.com/DeepBrainChain/DBC-DOC/blob/master/DBC_install/多重签名账户.md
The
Stash Account: When the GPU machine is bound onchain, the DBC will be staked from theStash Account, and when the rewards are distributed, it will be issued to theStash Account.Control accountis the manager, responsible for the operation of the machine, maintenance, etc.The
control accountalso needs some DBC, and some transaction fee generated by the operation on the chain will be deducted from thecontrol account.
1.2 Operation
Navigate to: Developer--Transaction, as shown below, select the setController method of the onlineProfile module, select your stash account and control account respectively, and click bind in the lower right corner

As shown above, BOB_STASH account (
Stash account) set DAVE account ascontrol account.
Stash Account:5HpG9w8EBLe5XCrbczpwq5TSXvedjrBGCwqxK1iQ7qUsSWFc
Control account:5DAAnrj7VHTznn2AWBemMuyBwZWs6FNFjdyVXUeYum3PTXFy
1.3 Check whether the stash account and control account are successfully bound
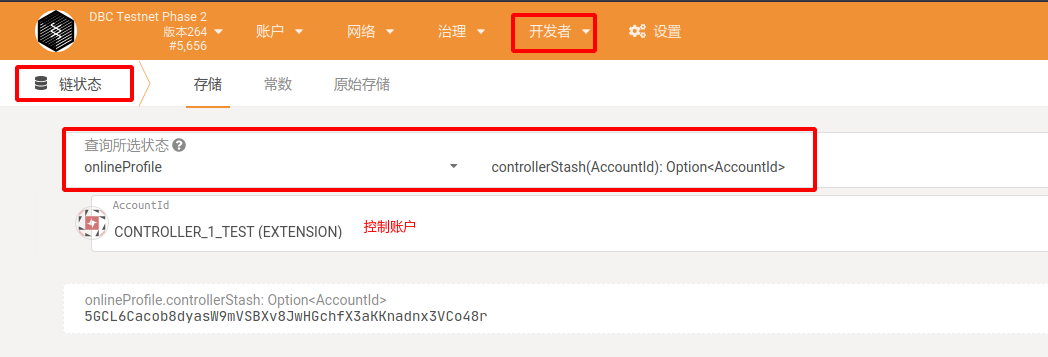
Query whether the stash account and the control account are successfully bound: as shown in the figure below, when the stash account is successfully bound to the control account, you can select controllerStash of the onlineProfile module through Developer--Chain Status, to query the stash account corresponding to the control account. In the figure below, a stash account corresponding to a control account is queried.

2. The machine generates a signed message
You need to use the machine's private key to generate a signed message and send it to the chain to confirm the stash account own this machine.
2.1 Query Machine ID and `Machine Private Key``
You need to query the machine private key on the machine where the DBC client program is installed. And use the private key to generate a signed message and send it to the chain.
# The machine ID and private key are in the directory of the dbc installation program, such as:
# /home/dbc/0.3.x.x/dbc_repo/dat/node.dat
# Its content is:
node_id=8eaf04151687736326c9fea17e25fc5287613693c912909cb226aa4794f26a48          # Machine ID
node_private_key=398f0c28f98885e046333d4a41c19cee4c37368a9832c6502f6cfd182e2aef89 # Machine private key
Use machine private key to generate signature data
Use the following script to generate signature data.
#Instructions
1. Install nodejs 14 on the linux server (the version must be 14, otherwise there will be other errors, please Google for the installation method)
2. Clone script: git clone https://github.com/DeepBrainChain/DeepBrainChain-MainChain.git
3. Installation: cd DeepBrainChain-MainChain/scripts/test_script && npm install
4. Execute the script
node gen_signature.js --key 0x398f0c28f98885e046333d4a41c19cee4c37368a9832c6502f6cfd182e2aef89 --msg 8eaf04151687736326c9fea17e25fc5287613693c912909cb226aa4794f26a485CiPPseXPECbkjWCa6MnjNokrgYjMqmKndv2rSnekmSK2DjL

### Message: 8eaf04151687736326c9fea17e25fc5287613693c912909cb226aa4794f26a485CiPPseXPECbkjWCa6MnjNokrgYjMqmKndv2rSnekmSK2DjL
### Signer: 8eaf04151687736326c9fea17e25fc5287613693c912909cb226aa4794f26a48
### Signature: 0x5cc8b4c49b244d7c071b124ef68119d7549dd805ea43f69e3c142fd5909f926041a9cad93b16085d72431df2d1164e7911085423bca16625295583686f2fce8c
--keyspecifiesmachine private key,and key is prefixed with 0x;
--msgspecifies the message that needs to be signed, and the message content ismachine ID+fund account;The data after
Signature:is the signature data.
2.3 Use Control Account to bond machine to stash_account
Now, we need to broadcast the signature data generated in the previous step through the control account.
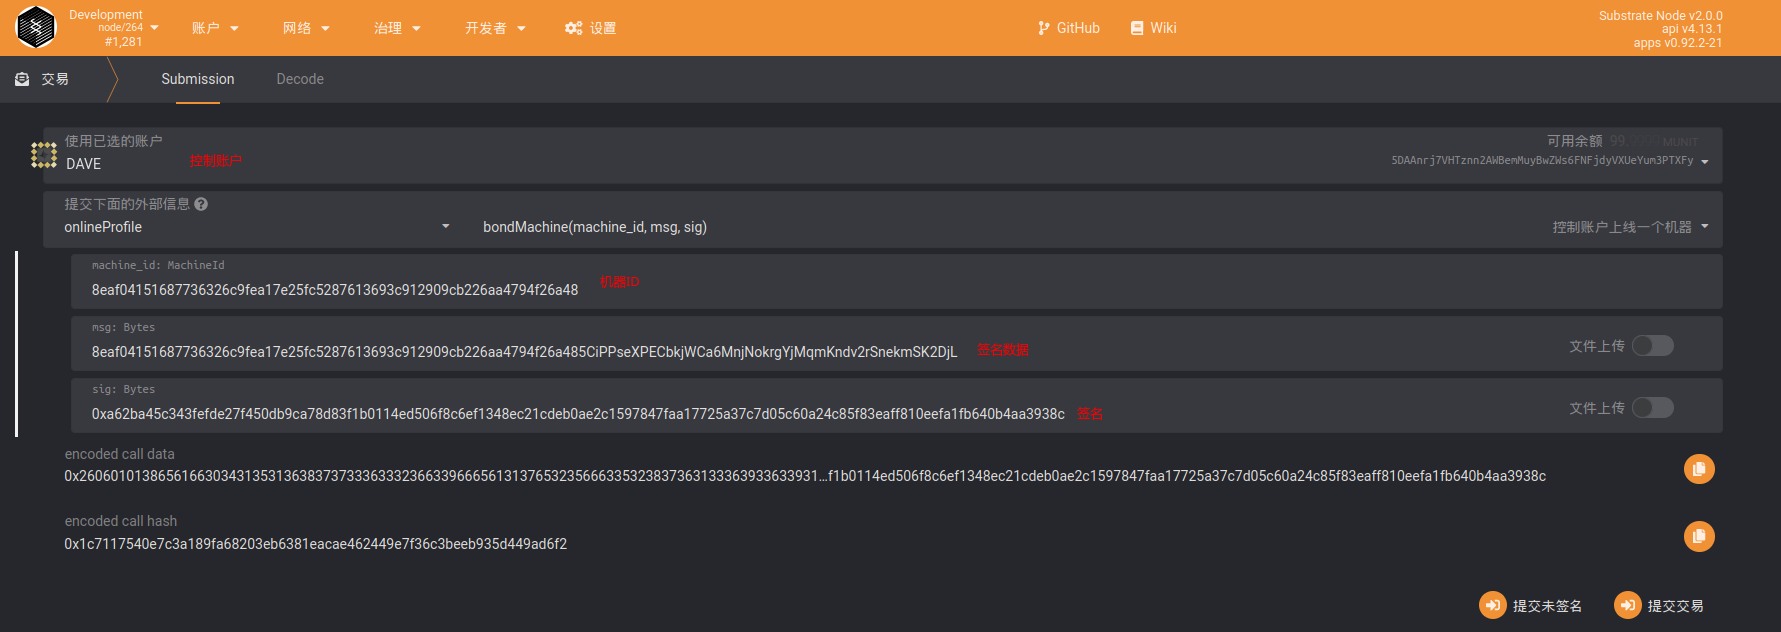
Navigate to: Developer--Transaction, and select the bondMachine method of the onlineProfile module as shown below. Use Control Account to bind Machine ID (MachineId) with Control Account. Fill in the parameters as shown below:

2.4 Query whether the machine is successfully bound:
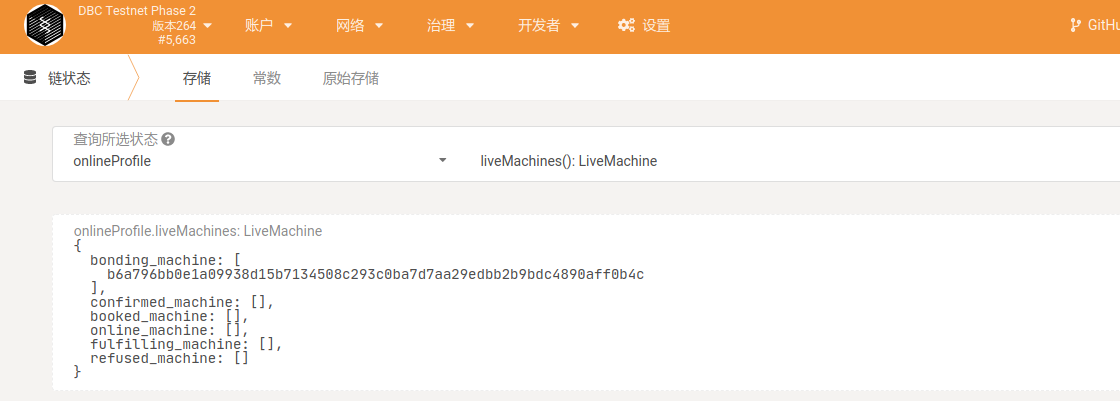
After completing this step, you can query the machines in the system through Developer--Chain Status--onlineProfile--liveMachines. As shown in the figure below, a machine is queried that has been bound. Next, you need to add machine information

3. Control account need to generate "computer room"
instruction
When the stash account is bound to the machine for the first time or the machine is in a new computer room, a new computer room ID needs to be generated. A transaction fee of 10 DBC is paid for each generation of a computer room.
If the machines to be bound are in the same computer room, just generate the computer room information once. If the machines are in different computer rooms, the corresponding number of computer rooms will be generated according to the situation. When adding machine information, select the corresponding computer room (if the machines are in the same computer room, you can add the same computer room ID each time you add machine information).
3.1 Operation: Generate new room information on the chain

3.2 Query the computer room records generated under the stash account
Navigate to developer--chain status, through stash account, view the computer room bound under stash account: the following figure generates two computer rooms, and the query parameter is the fund account.

4. Control account add machine information
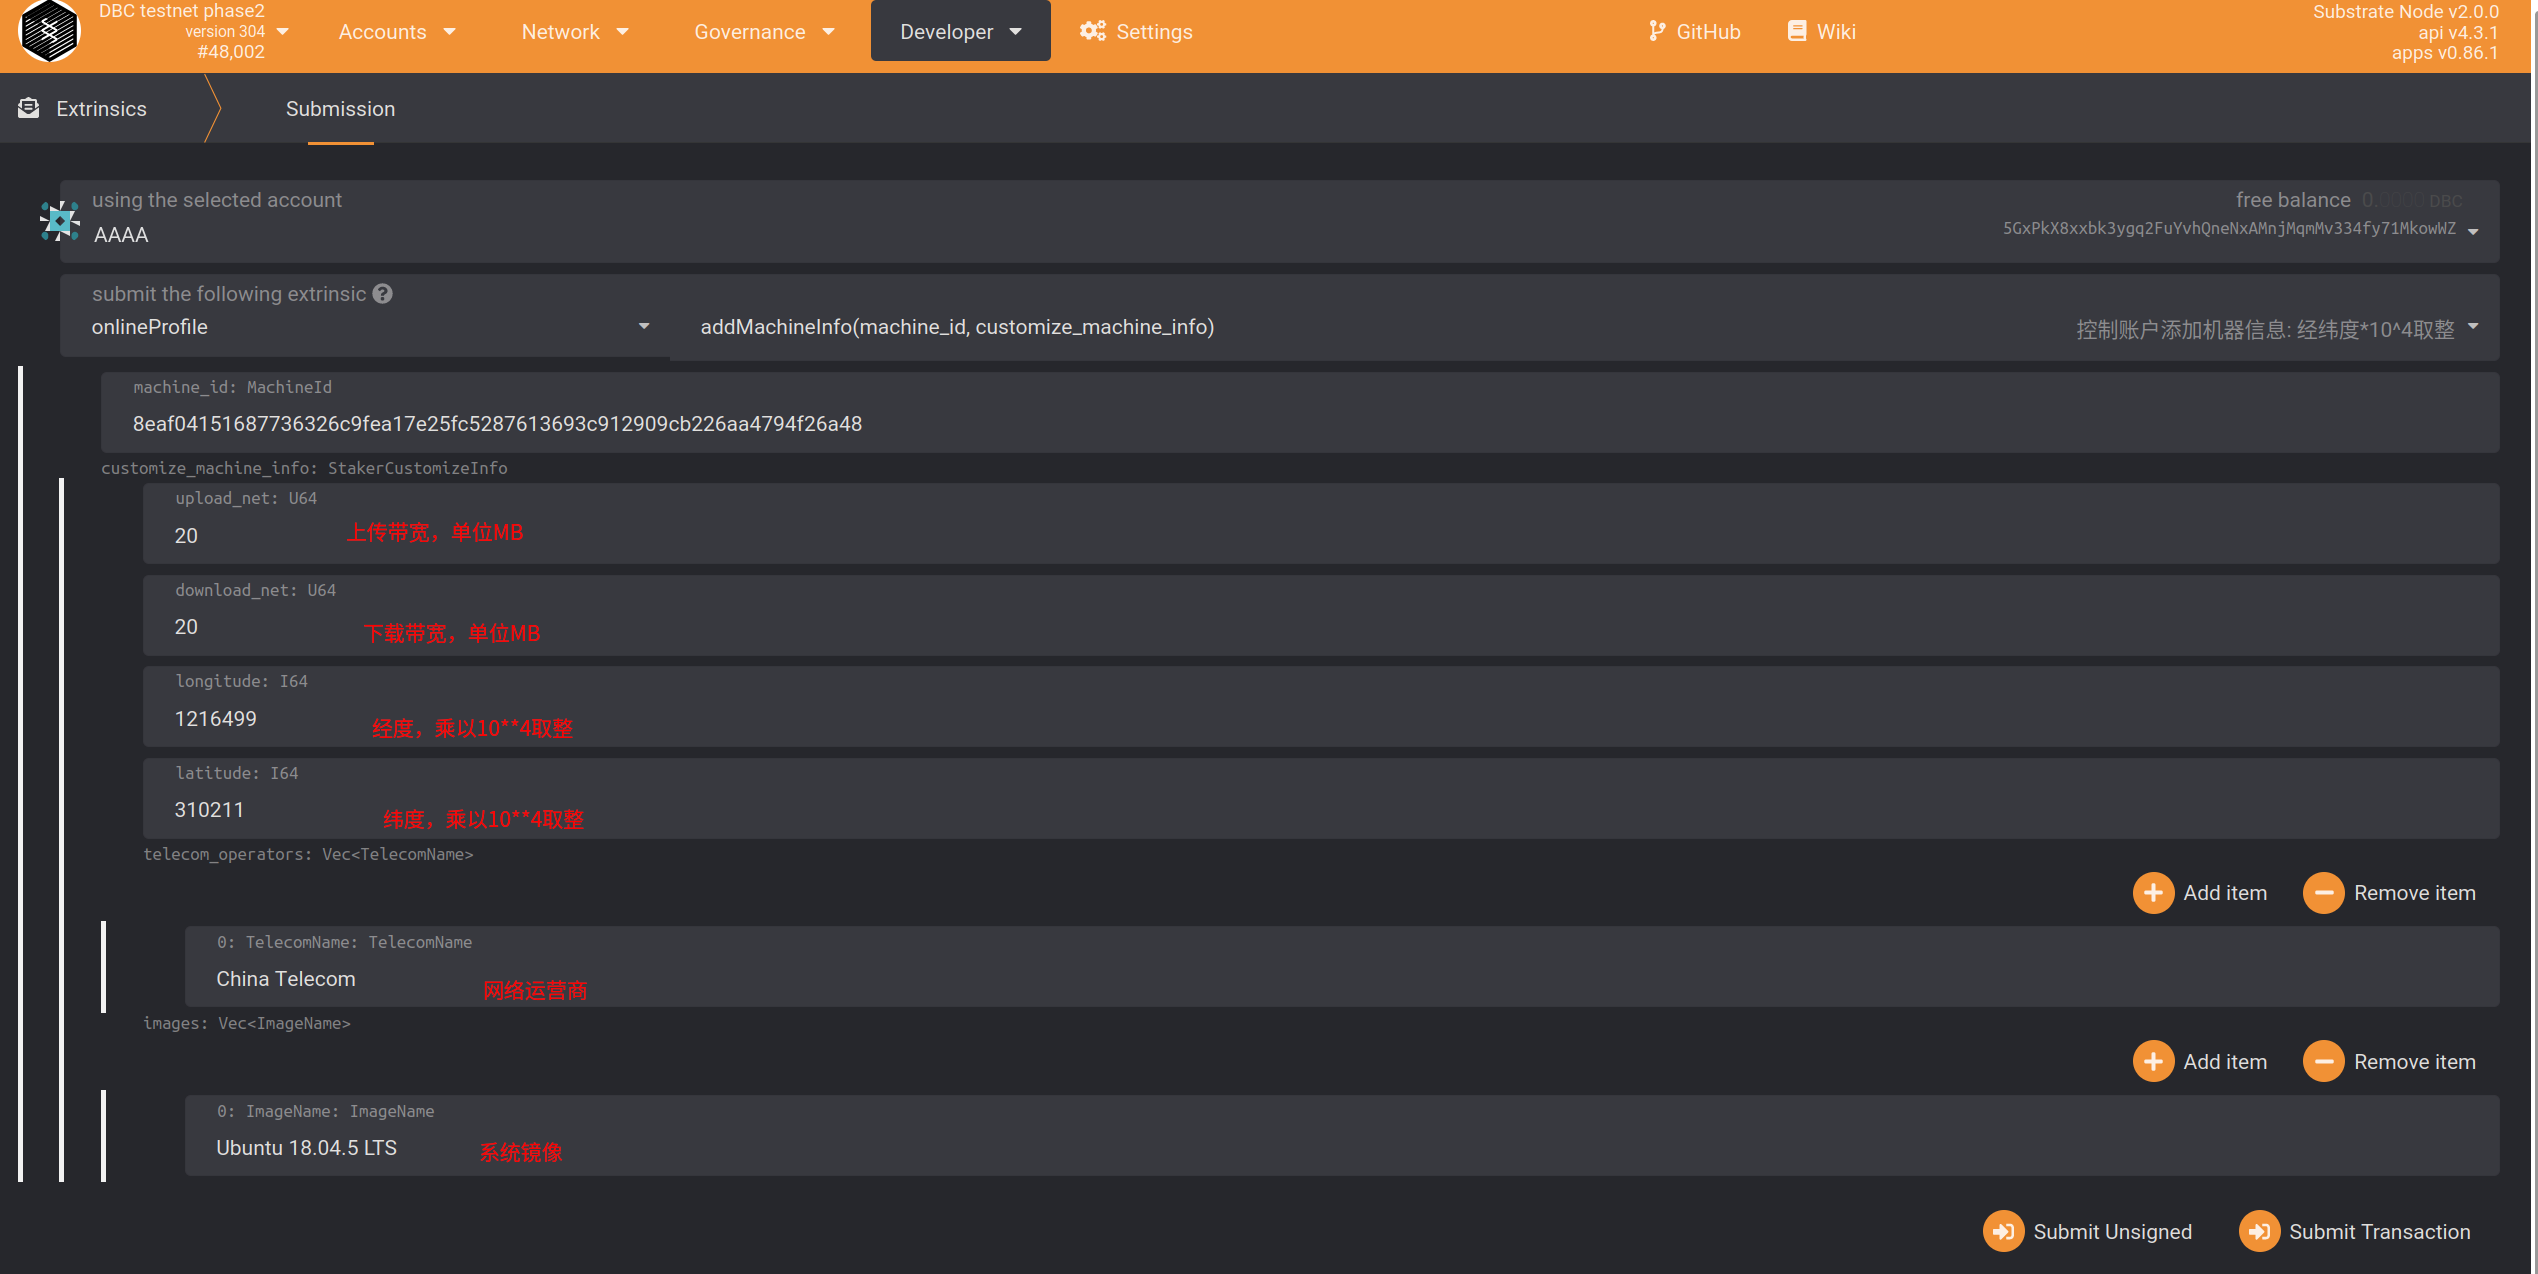
Control account also needs to add machine information: Navigate to Developer -- Transaction--onlineProfile--addMachineInfo

Parameter description:
server_name: Select the computer room ID generated in the previous step
upload_net: upload bandwidth (take 20MB bandwidth as an example, fill in 20).
download_net: download bandwidth (take 20MB bandwidth as an example, fill in 20).
longitude: Longitude. Take the East longitude 131.1548123 as an example, fill in
East 1311548. Be careful not to fill in the longitude and latitude upside down. The error can be within the range of 30 km, and the staking will be deducted if the content is wrong).latitude: Latitude. Take south latitude 121.143253 as an example, fill in
South 1211432. Be careful not to fill in the longitude and latitude upside down.The error can be within the range of 30 km, and the pledge will be deducted if the content is wrong.Computer room network information, you can choose from the following according to the situation: (China Mobile: China Mobile, China Unicom: China Unicom, China Telecom: China Telecom, non-Chinese operators fill in according to their actual names.The pledge will be deducted if the content is wrong)
5. Check and receive rewards
5.1. Check rewards
In the developer--chain status, select: the stashMachines method of the onlineProfile module, fill in the parameters in stash account, you will be able to find the detailed information of the reward for the stash account.
Among them, can_claim_reward is the reward that can be claimed, and left_reard is the remaining part of the reward obtained every day before (the remaining 75%, this 75% will be released in the subsequent 150 antennas).

5.2. Collect rewards
Use Control Account to claim reward, and rewards will be issued to Stash Account.

6. Query the machine bounded to the account
View the machines on the chain under the fund account: Navigate to
Developer----Chain Status----Storage----onlineProfile----stashMachinesView the machines on the chain under the control account: Navigate to
Developer----Chain Status----Storage----onlineProfile----controllerMachines