Become a verified node on the DBC AI public chain
Become a verified node on the DBC AI public chain
Note: 1. Before you start the execution, be sure to use a new db_data to start the node to prevent data synchronization errors, which will cause you to be unable to generate blocks and be punished. 2. If you have participated in the election or started a new node, please generate a new sessionkey in time and replace it in the Staking-Account section
0. Machine Configuration
- RAM: 8G
- CPU: 2 cores
- Hard disk: 300G+ (500G recommended)
- System: Ubuntu 20.04 and above (22.04 recommended)
1. Generate funding account (existing funding account can be skipped)
Reference: How to generate account
2. Get dbc-chain binary
Way 1: Use the precompiled version
sudo mkdir dbc-chain-mainnet && cd dbc-chain-mainnet

wget https://github.com/DeepBrainChain/DeepBrainChain-MainChain/releases/download/v4.0/dbc-chain-4.tar.gz -O dbc_chain_linux_x64.tar.gz

tar xf dbc_chain_linux_x64.tar.gz
Way 2: Compiling from source code
### Install dependencies
curl https://getsubstrate.io -sSf | bash -s -- --fast
source ~/.cargo/env

# Compile dbc-chain
git clone https://github.com/DeepBrainChain/DeepBrainChain-MainChain.git
cd DeepBrainChain-MainChain
cargo build --release
3. Run the synchronization node
nohup ./dbc-chain --base-path ./db_data --chain=mainnet --port 30333 --rpc-port 9983 --pruning=archive --name dbc-chain --rpc-cors=all --rpc-methods=unsafe --rpc-external 1>dbc_node.log 2>&1 &
If you are compiling from source, the path to the executable is:
. /target/release/dbc-chain.When synchronization is complete,
Control + Ccloses the program. You can tell if the synchronization has completed by comparingtargettobest. When the difference between target and best is small (e.g., within 100), you can assume that the synchronization is complete.

- Parameter description:
--base-path: specifies the directory where this blockchain stores data. If not specified, the default path will be used. If the directory does not exist, it will be automatically created for you. If the directory already has blockchain data, an error will be reported and you should choose a different directory or clear the contents of that directory.--pruning=archive: start the blockchain as archive
4. Run the node as a verifier
# Start the node

nohup ./dbc-chain --base-path ./db_data --chain=mainnet --port 30333 --rpc-port 9983 --validator --pruning=archive --name YourNodeName --rpc-cors=all --rpc-methods=unsafe --rpc-external  1>dbc_node.log 2>&1 &

# If you get a startup error

. /dbc-chain: /lib/x86_64-linux-gnu/libstdc++.so.6: version `GLIBCXX_3.4.30' not found (required by . /dbc-chain)
. /dbc-chain: /lib/x86_64-linux-gnu/libstdc++.so.6: version `GLIBCXX_3.4.29' not found (required by . /dbc-chain)
. /dbc-chain: /lib/x86_64-linux-gnu/libc.so.6: version `GLIBC_2.32' not found (required by . /dbc-chain)
. /dbc-chain: /lib/x86_64-linux-gnu/libc.so.6: version `GLIBC_2.34' not found (required by . /dbc-chain)
. /dbc-chain: /lib/x86_64-linux-gnu/libc.so.6: version `GLIBC_2.33' not found (required by . /dbc-chain)


# Solution:

#1. devices in China region:
echo “deb http://mirrors.aliyun.com/ubuntu/ jammy main” >> /etc/apt/sources.list
sudo apt update
sudo apt install libc6 libstdc++6 -y
#For non-Chinese devices, echo “deb  jammy main”:
echo “deb http://archive.ubuntu.com/ubuntu/ jammy main” >> /etc/apt/sources.list
sudo apt update
sudo apt install libc6 libstdc++6 -y
- If you are compiling from source, the path to the executable is: `. /target/release/dbc-chain`.

- Note that here **`--name YourNodeName` is to set your node name**, you can give your node a unique and easily recognizable name and others will be able to see it on the network.
5. Generating a rotateKey
Run the following command on the machine where you are running the verifier node command
curl -H "Content-Type: application/json" -d '{"id":1, "jsonrpc":"2.0", "method": "author_rotateKeys", "params":[]}' http://localhost:9983
6. Setting the bond amount
Open [https://www.dbcwallet.io/?rpc=wss://info1.dbcwallet.io#/accounts](https://www.dbcwallet.io/?rpc=wss://info1.dbcwallet.io#/ accounts) You will be able to see your balance:
Navigate to
Network>Pledge>Account Operations>Storage Accounts.

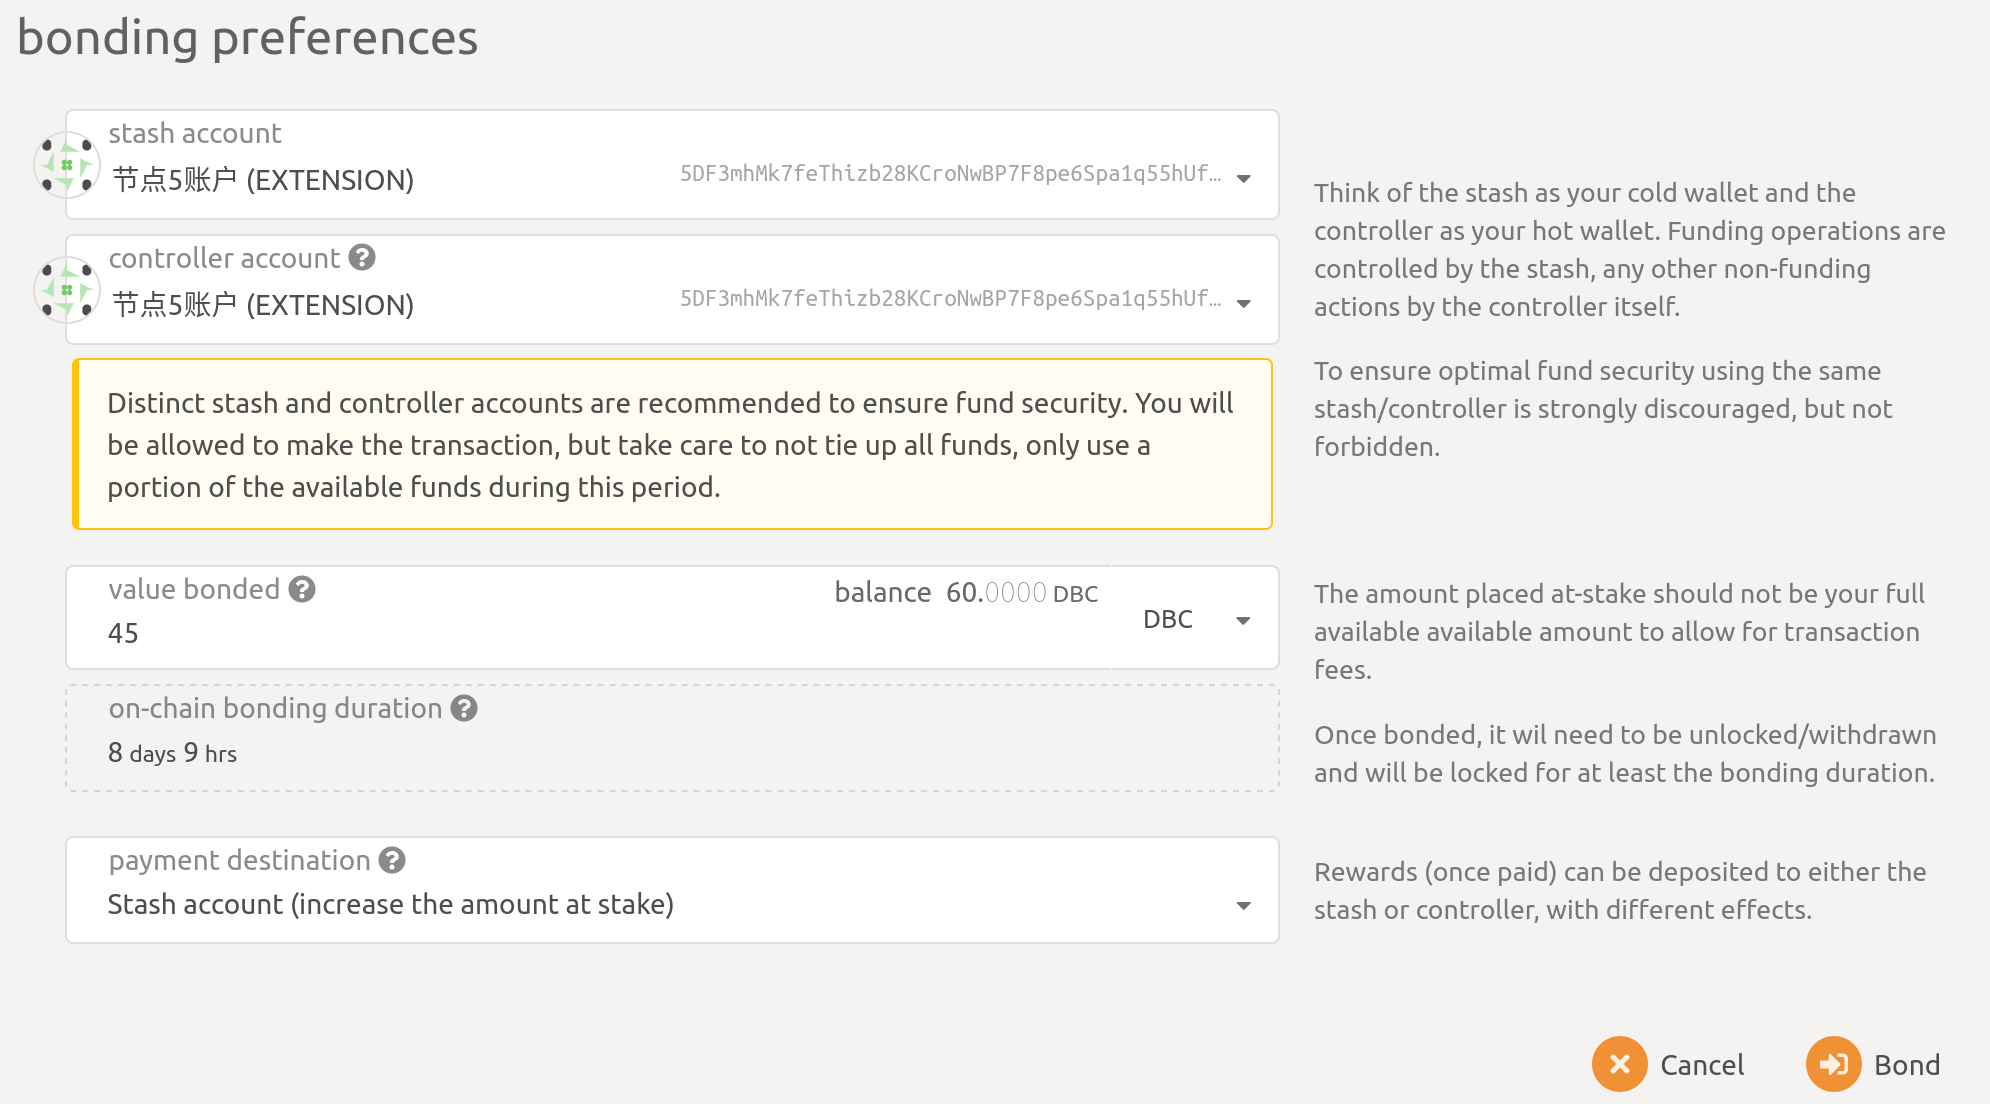
- Set the amount of the bond (make sure that in addition to the bond amount, you have a balance in your account to use to send the transaction):

Description:
Stash account: your funding account, here we bond 45 DBC, make sure there is at least this much balance in the accountcontroller account: this account should also have a small amount of DBC to send start and stop verifier transactionsvalue bonded: how many DBC you want to bond/stake, please note that you don't need to bond the entire balance in the account, plus you can increase the bond amount later.payment destination: the reward the verifier gets will be sent to this account. This account can be set to any account. Among others.Stash account(increase the amount at stake): the proceeds are issued to the stash account and are pledgedStash account(do not increase the amount at stake): proceeds are issued to the stash account and are not pledged
7. Setting up the `rotateKey
- After executing the bond, you will be able to see the
Session Keybutton on Polkadot:

- Click on it and populate it with the
rotateKeysgenerated in step 5.

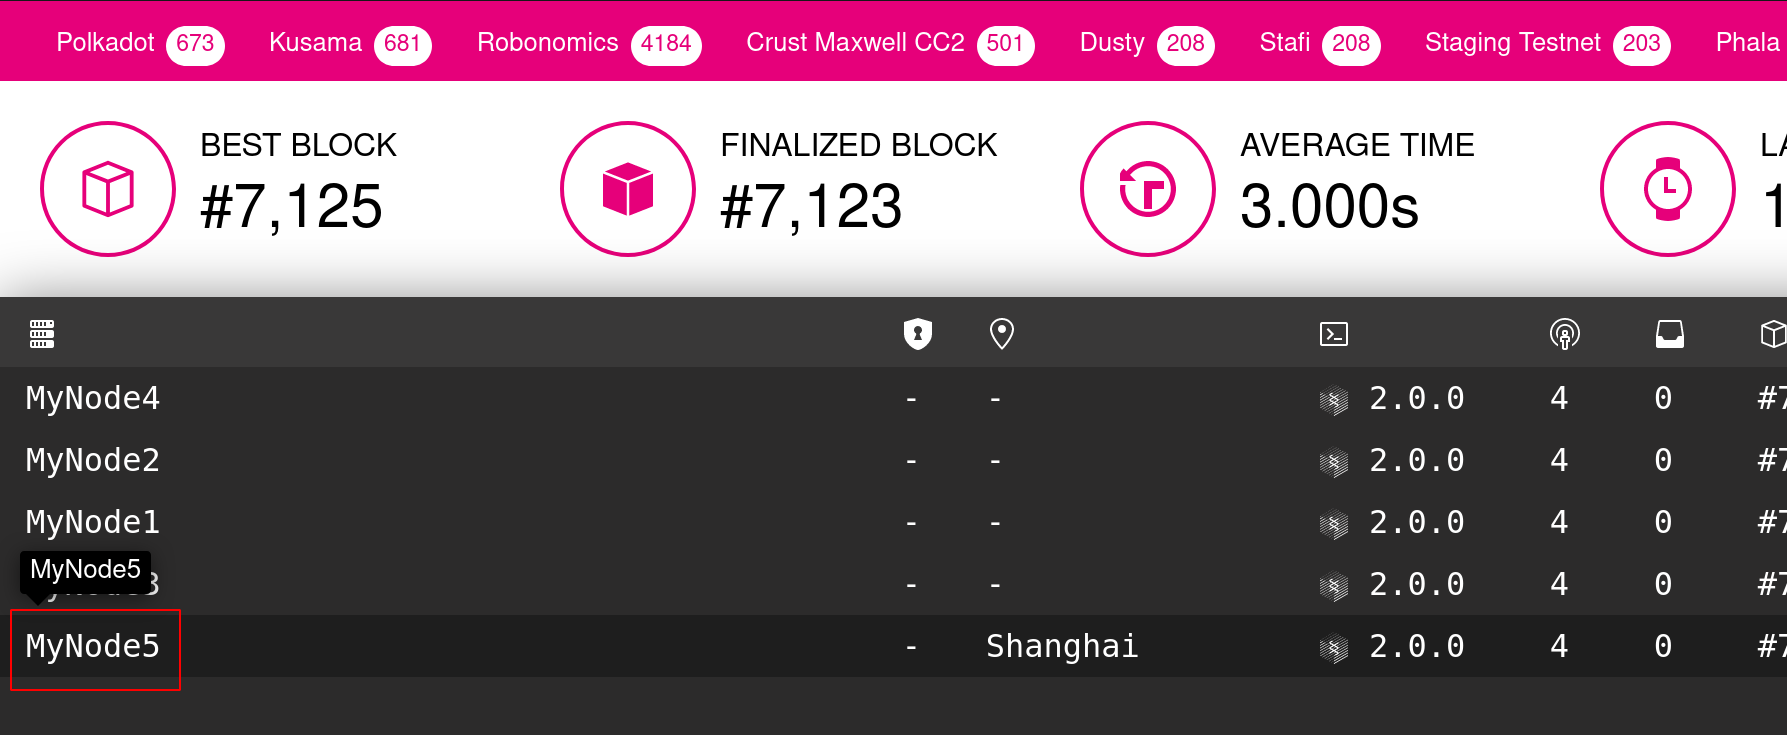
- Now you can go to Telemetry and see your node! !

8. Setting Up Participation in the Validator Election
- After completing the above steps, you will be able to see the
Validatebutton. Click on theValidatebutton.

- At this point you will need to set the Validator Preferences:

- In the
reward commission percentagefield, you will need to enter your revenue preference as a verifier. Then clickValidatein the bottom right corner and send the transaction. In theWaitingscreen, you will be able to see that your account is waiting for the nextEra, to participate in the election to become a Validator node.

9. Claiming node rewards
Login to your stash account in the browser plugin polkadot and in Pledge > Payments > Max 84 eras you will be able to see all pending rewards:

Just click Pay All on the right side and send the transaction.
Translated with DeepL.com (free version)