DBC GPU 云服务
大约 13 分钟
DBC GPU 云服务
前言:
- 以下内容仅作演示用例,具体实施请根据自身情况安装适合的软件版本,并及时关注相关中间件漏洞信息进行升级或者修补,以防被恶意攻击。
一、数据库部署
安装&设置数据库
#1. 下载:
curl -O <https://fastdl.mongodb.org/linux/mongodb-linux-x86_64-3.0.6.tgz>

#2. 解压:
tar -zxvf mongodb-linux-x86_64-3.0.6.tgz

#3. 将解压包拷贝到指定目录:

mkdir /data
mkdir /data/mongodb
mongodb-linux-x86_64-3.0.6/ /data/mongodb

#4. 设置环境变量:

sudo echo "export PATH=/data/mongodb/bin:$PATH"  >> /etc/profile
source /etc/profile

#5. 创建数据库目录:

mkdir -p /data/db  mkdir -p /data/db/master

#6. 创建:/etc/mongod.conf 添加授权(这样数据库需要密码才能登陆)

storage:
  dbPath: /data/db/master
  journal:
	enabled: true

net:
  port: 27017
  bindIp: 0.0.0.0

security:
  authorization: enabled

#7. 创建admin和identifier数据库,并且设置密码

 1) mongod --dbpath /data/db/master,然后  mongo
 2) use admin
 3) db.createUser({ user: "admin", pwd: "*****", roles: [{ role: "root", db: "admin" }] })  设置管理员账户
 4) db.shutdownServer()  关闭mongo数据
 5) screen -S mongod  后台运行命令
 6) mongod --config /etc/mongod.conf (需要提前配置好mongod.conf文件) 此处如果要配置2个不同服务器的数据库自动备份,
    则用命令:mongod --master --slave --autoresync --config /etc/mongod.conf  --source ip:27017
 7) mongo,然后use admin ,然后 db.auth('admin','******'),
 8) use identifier  创建identifier数据库,此处数据库名字nodejs服务器代码中名字需要保持一致
 9) db.createUser({user: "dbc", pwd: "*******", roles: [ { role: "dbOwner", db: "identifier" } ]})
 10) #设置加价规则,percentage_signle为单个租用虚拟机的加价大小,percentage_whole为租用整机的加价大小,参数后跟数字,1为1%,示例为40%
        db.DBCPercentage.insert({ _id: 'percentage',percentage_signle: 40, percentage_whole: 50 })
 11) db.DBCPercentage.find({}).toArray()    查看设置是否生效
二、搭建 DBC 客户端
#装DBC客户端
安装环境

apt-get install libvirt-clients libvirt-daemon-system

1. 下载安装脚本: <https://github.com/DeepBrainChain/DBC-AIComputingNet/releases/>

下载其中的install_client.sh脚本文件

2. 给install_client.sh脚本文件添加执行权限: 命令行下执行:chmod +x install_client.sh

3. 运行安装脚本: 命令行下执行:./install_client.sh [安装目录]

安装过程中会要求用户输入2个端口号:根据情况填写即可,比如:net_listen_port=5001,http_port=5002

#升级DBC客户端
1. 下载升级脚本: <https://github.com/DeepBrainChain/DBC-AIComputingNet/releases/>

下载其中的update_client.sh脚本文件

2. 给update_client.sh脚本文件添加执行权限: 命令行下执行:chmod +x update_client.sh

3. 运行升级脚本: 命令行下执行:./update_client.sh [原客户端安装目录]
三、部署 Node 服务器
#克隆代码

#通过git克隆链接地址 https://github.com/DeepBrainChain/DBC-NodeScript.git将代码克隆到本地或服务器
git clone https://github.com/DeepBrainChain/DBC-NodeScript.git

### 部署代码

#代码克隆以后,可使用 forever 插件创建定时任务,将node代码运行在服务器后台,通过ip加启动router.js的启动server服务端口号,即可访问对应的接口。
服务器安装node示例:<https://www.cnblogs.com/niuben/p/12938501.html>
forever部署示例请参考:<https://blog.csdn.net/superjunjin/article/details/73252194>
(注意:安装forever以后如果未找到,可通过 npm list -g --depth 0 查找forever文件夹安装目录,进入forever/bin/目录下将forever软连接到/usr/bin/forever 全局使用)
#检查node 和 forever 是否安装成功,执行以下命令
node -v // v16.13.0
forever --version // v4.0.1

#执行无误后,进入DBC-NodeScript文件夹下,运行以下命令,在文件夹下生成 node_modules 文件夹
npm install

#执行无误后,在DBC-NodeScript文件夹下,打开publicResource.js文件,修改相关配置信息
export const wssChain
export const baseUrl
export const mongoUrlSeed
export const walletInfo
export const designatedWallet
#注意:mongoUrlSeed 及 walletInfo 为加密的字符串,需要提前生成,生成规则及方法需联系相关技术人员

#进入 DBC-NodeScript\HttpRequest 文件夹下,执行
forever start -o http-out.log -e http-err.log router.js //启动nodejs的server服务

#此时已经将router.js挂载到后台运行,server服务启动,此时即可访问接口
nodeHost = http://xxx.xxx.xxx.xxx:8090

#进入 DBC-NodeScript\TimedTask 文件夹下,运行文件夹下的js文件,启动的定时任务,即可实时更新数据库信息,例如:
forever start -o ver-out.log -e ver-err.log VerificationMachine.js
#注意:TimedTask文件夹下的文件必须全部运行,否则会导致数据库数据与实际数据不符
以下部分为目录解释:
HttpRequest 目录
用于书写与前端交互的详细接口内容
api.js
- 定义 express 路由
/** * 定义路由,便于分辨对应模块 * 导出路由模块,在router.js文件中引用 */ export const Select = express.Router()- 创建路由对应接口
Select.get('/', (request, response ,next) => {
    ******
    调用数据库,已经数据的处理与返回
    ******
})
router.js
- 定义请求信息
- 设置请求头
/** * 导入api.js中路由模块 * 设置请求头,启动server服务 */ // 使用 router serve.use('/api/select', Select)- 启动 server 服务
serve.listen(8090, ()=>{
    console.log('服务器启动完毕');
})
TimedTask 目录
- 用于创建只与数据库进行交互的 js 文件,定时请求数据存入数据库中,以便数据及时更新
testScript 目录
- 用于创建 node 可执行脚本,仅供测试使用
publicResource.js
- 用于公用基础信息配置,注意修改
/**
 * wssChain 调用链名称
 */
export const wssChain = {
  dbc: 'wss://info1.dbcwallet.io' // 公链正式链,也可以自己部署DBC钱包客户端
}

/**
 * baseUrl c++ 端口
 */


export const baseUrl = '<http://ip:port>' // 步骤三中的dbc客户端ip和端口号


/**
 * 连接mongo数据库
 */
export const mongoUrlSeed = 'ba22370884954c456be7fc10cbae7a652fbadfb64e4ab9aab4a8a944f1f8ea052abc8968bfdb05ac1dc0f0842872089e' // 服务器访问mongo加密字段

/**
 * 钱包数据
 */
export const walletInfo = '16c2efe71e094d0b3dd7b319da9c6a636cc0c7740cb6e900a40220fc3b77ec8f22a99f79' // 服务器访问钱包加密字段

/**
 * 定义租用机器获取收益差额的钱包
 */
export const designatedWallet = '5F7L9bc3q4XdhVstJjVB2o7S8RHz2YKsHUB6k3uQpErTmVWu' // 用户支付的dbc收益部分会进入此钱包,需替换成自己的钱包地址
四、部署 web 环境
#下载代码到本地或服务器(注意:master分支下的代码可能为测试版,部署时请以tags最新版本代码为准)
1. 克隆代码
#通过git克隆链接地址 https://github.com/DeepBrainChain/DBChainWebsite.git 将代码克隆到本地或服务器,运行
git clone https://github.com/DeepBrainChain/DBChainWebsite.git

#查询所有tag
git tag

#切换tag代码
git checkout <tag-name>

#检查是否安装Node,运行以下命令,检查Node是否全局安装
node -v //v16.13.0

#安装完成后,打开DBChainWebsite文件夹,运行以下命令,生成node_modules文件
npm install

#执行成功后,运行以下命令,可以本地启动网页运行云平台,进行测试。
npm run serve

2. 修改云平台logo图案配置
#打开文件夹 src--> locales --> CN.js && EN.js && RU.js, 将website_name字段设置为自己云平台的名称,本地运行即可查看
#修改website_name

export default {
	···
	website_name: 'dbchain', // dbchain, 1024lab, tycloud
	···
}

3. 配置接口访问域名
#打开文件夹 src--> api --> index.js,配置自己配置的服务器接口,即可修改自己所属的node接口访问域名
#修改文件,使用nodeHost

const nodeHost = 'https://xxxxxx'   //nodejs 服务器地址

4. 修改访问链地址
#打开文件夹 src--> utlis --> dot --> api.ts && index.ts ,配置访问链
const node = {
    ···
    dbc: 'wss://info1.dbcwallet.io' // 公链正式链
    ···
}

5. 生成dist文件部署服务器
#打开DBChainWebsite文件夹,运行以下命令,生成dist文件夹(DBChainWebsite文件夹下),将dist文件夹放在指定的服务器文件,通过配置nginx指定dist文件中的index.html文件,即可访问页面
npm run build
五、部署 Nginx
# 安装Nginx
sudo apt install nginx -y

# 配置nginx
mkdir /etc/nginx/gpucloud //上传ssl证书到此文件夹中
mkdir /etc/nginx/gpucloud.conf
sudo vim /etc/nginx/gpucloud.conf

#示例如下,实际请按照自身环境改动,仅作参考

server{

        listen 443;
        server_name nodejs.xxxx.xxxx;
        ssl on;

        ssl_certificate   cert/gpucloud/example.crt;
        ssl_certificate_key  cert/gpucloud/example.key;
        ssl_session_timeout 5m;
        ssl_ciphers ECDHE-RSA-AES128-GCM-SHA256:ECDHE:ECDH:AES:HIGH:!NULL:!aNULL:!MD5:!ADH:!RC4;
        ssl_protocols TLSv1 TLSv1.1 TLSv1.2;
        ssl_prefer_server_ciphers on;

        location / {

        proxy_pass http://ip:8090; #nodejs server ip and port
        proxy_set_header   Host             $host;
                         proxy_set_header   X-Real-IP        $remote_addr;
                         proxy_set_header   X-Forwarded-For  $proxy_add_x_forwarded_for;


        }


    }


server {
         listen 80;
        server_name nodejs.xxxx.xxxx;

        location / {

         proxy_pass http://ip:8090; #nodejs server ip and port
        proxy_set_header   Host             $host;
                         proxy_set_header   X-Real-IP        $remote_addr;
                         proxy_set_header   X-Forwarded-For  $proxy_add_x_forwarded_for;

        }


    }

server{

        listen 443;
        server_name dbcnode.xxxx.xxxx;
        ssl on;

        ssl_certificate   cert/gpucloud/example.crt;
        ssl_certificate_key  cert/gpucloud/example.key;
        ssl_session_timeout 5m;
        ssl_ciphers ECDHE-RSA-AES128-GCM-SHA256:ECDHE:ECDH:AES:HIGH:!NULL:!aNULL:!MD5:!ADH:!RC4;
        ssl_protocols TLSv1 TLSv1.1 TLSv1.2;
        ssl_prefer_server_ciphers on;

        location / {

        proxy_pass http://ip:5002; #dbc client node ip and port
        proxy_set_header   Host             $host;
                         proxy_set_header   X-Real-IP        $remote_addr;
                         proxy_set_header   X-Forwarded-For  $proxy_add_x_forwarded_for;


        }


    }


server {
         listen 80;
        server_name dbcnode.xxxx.xxxx;

        location / {

        proxy_pass http://ip:5002; #dbc client node ip and port
        proxy_set_header   Host             $host;
                         proxy_set_header   X-Real-IP        $remote_addr;
                         proxy_set_header   X-Forwarded-For  $proxy_add_x_forwarded_for;

        }


    }


server {
         listen 443;
        server_name www.xxxx.xxx; #gpu cloud website url
        ssl on;

        ssl_certificate   cert/gpucloud/example.crt;
        ssl_certificate_key  cert/gpucloud/example.key;
        ssl_session_timeout 5m;
        ssl_ciphers ECDHE-RSA-AES128-GCM-SHA256:ECDHE:ECDH:AES:HIGH:!NULL:!aNULL:!MD5:!ADH:!RC4;
        ssl_protocols TLSv1 TLSv1.1 TLSv1.2;
        ssl_prefer_server_ciphers on;

        location / {

            root /data/dbc-website;
            try_files $uri $uri/ /index.html;
           index index.html index.htm;

        }
        location = /50x.html {
            root html;
        }
        error_page 500 502 503 504  /50x.html;

    }

server {
         listen 443;
        server_name xxxx.xxx; #gpu cloud website url ,no include www
        ssl on;

        ssl_certificate   cert/gpucloud/example.crt;
        ssl_certificate_key  cert/gpucloud/example.key;
        ssl_session_timeout 5m;
        ssl_ciphers ECDHE-RSA-AES128-GCM-SHA256:ECDHE:ECDH:AES:HIGH:!NULL:!aNULL:!MD5:!ADH:!RC4;
        ssl_protocols TLSv1 TLSv1.1 TLSv1.2;
        ssl_prefer_server_ciphers on;

        location / {

            root /data/dbc-website;
            try_files $uri $uri/ /index.html;
            index index.html index.htm;

        }
        location = /50x.html {
            root html;
        }
        error_page 500 502 503 504  /50x.html;

    }


server {
        listen 80;
        server_name xxxx.xxx;
        return 301 http://www.xxxx.xxx$request_uri;
}


server {
        listen 80;
        server_name www.xxxx.xxx;
        rewrite ^(.*)$ https://${server_name}$1 permanent;

       }


# 检测Nginx配置是否正确
sudo nginx -t

# 启动并设置开机自起
sudo nginx -s reload
sudo systemctl start nginx
sudo systemctl enable nginx
六、Paypal 相关文档
1.注册 Paypal 账户
- 注册 Paypal 账户(个人公司不限) https://www.paypal.com/c2/home
- 登录 paypal 开发者网站 https://developer.paypal.com/developer/applications/
2.获取 Client ID & Secret
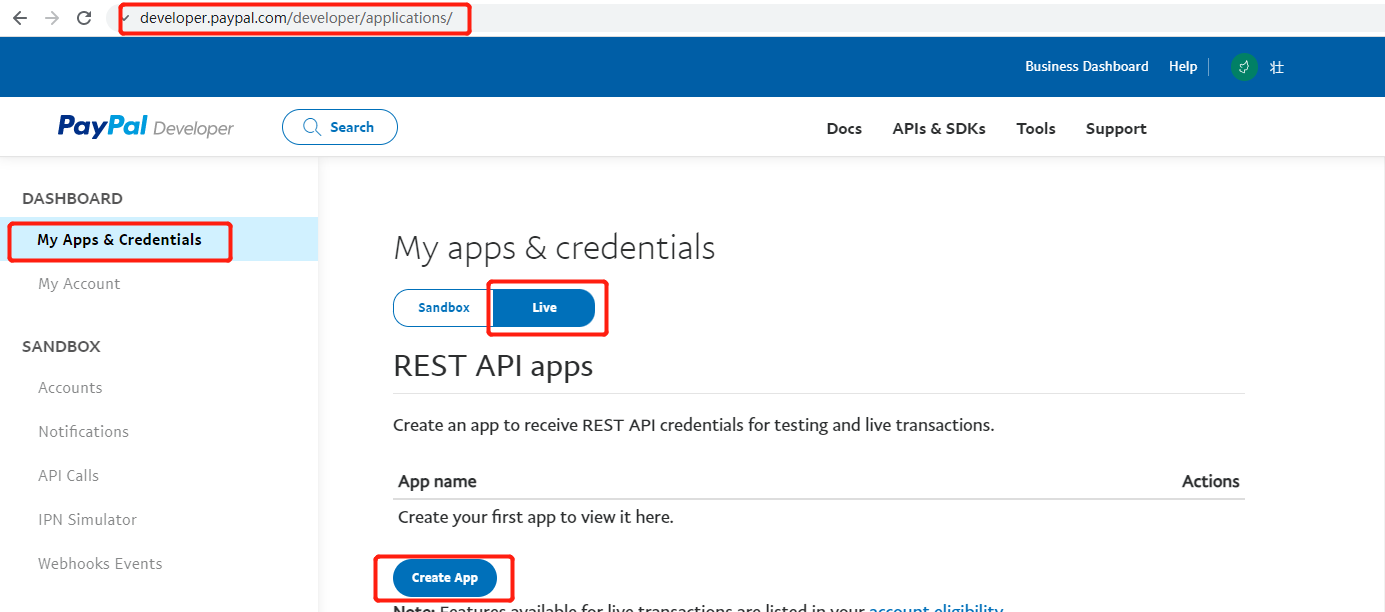
- 进去开发者页面,如下图,选择 Live 选项,点击 Create App 按钮,创建应用程序来接收用于测试和实时交易的 REST API 凭证。
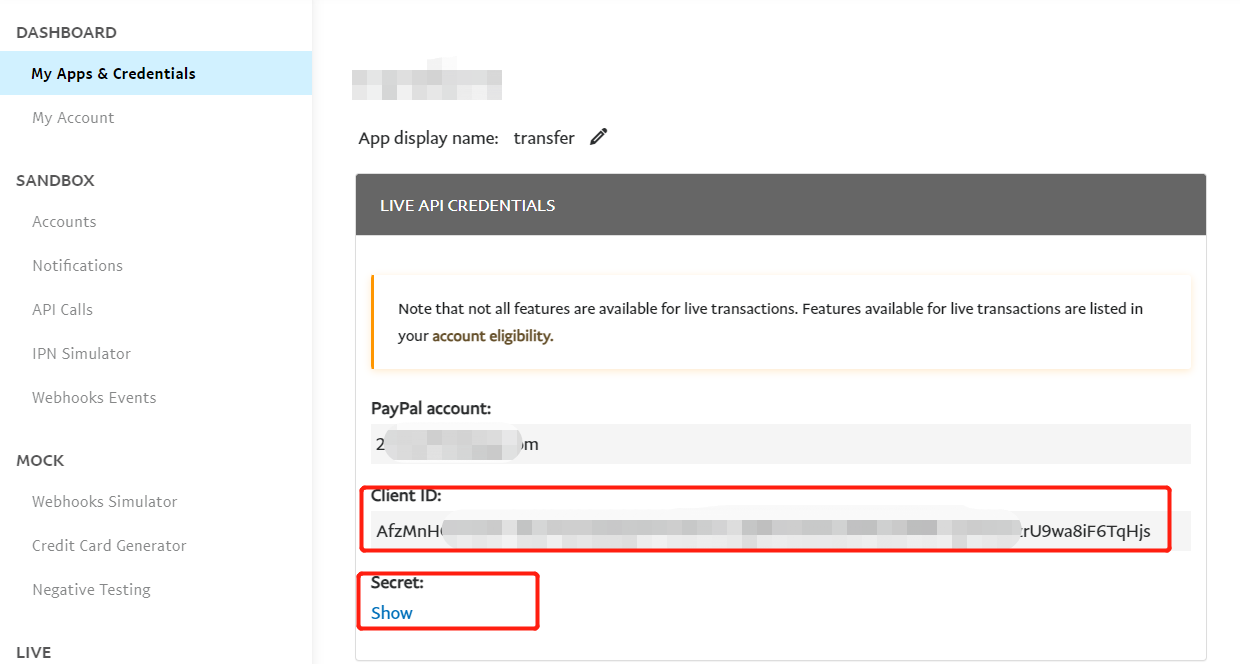
- 根据页面提示创建 App,操作完成后,即生成自己的 App,如下图,可查看自己的 Client ID & Secret
3. 修改云平台中相关的 Paypal 参数
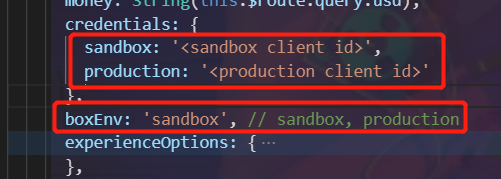
打开文件夹 src--> views --> trade_io --> buy_3.vue, 修改其中的字段,其中 sandbox 为沙盒测试版,production 为正式上线版
// 修改credentials , boxEnv

// 填入步骤2中所获取的Client ID
credentials: {
    sandbox: '<sandbox client id>', // 沙盒测试版, 上正式环境,可不填此选项
    production: '<production client id>'  // 正式版 上正式环境,必填项
},
boxEnv: 'sandbox', // 沙盒测试版: sandbox, 正式版: production
4. 修改 node 服务器端相关的 Paypal 参数
打开文件夹 DBC-NodeScript--> publicResource.js
// 修改paypalUrl
/**
 * paypal访问域名
 */
 export const paypalUrl = 'https://api-m.sandbox.paypal.com' // 沙盒测试
// export const paypalUrl = 'https://api-m.paypal.com' // 正式版本
5. 数据库配置
- 设置 contractwallet 集合(存储用于转账的合约钱包地址及私钥)
- 设置 paypalInfo 集合(存储 paypal 查询所需要的 CLIENT_ID 以及 SECRET)
// contractwallet集合
db.contractwallet.insert({
    _id:'contractwallet', // 不能修改,固定_id为'contractwallet'
    "wallet":'your wallet', // 转账用的钱包地址
    "seed":'your seed' // 转账用的钱包地址私钥
})

// paypalInfo集合
db.paypalInfo.insert({
    _id:'paypal', // 不能修改,固定_id为'paypal'
    "Client_ID":'your Client_ID', // 自己app对应的Client_ID
    "Secret":'your Secret' // 自己app对应的Secret
})
七、支付宝相关文档
1.登录支付宝开发者平台
- 打开支付宝开放平台 - 控制台 https://open.alipay.com/develop/manage
- 选择 网页/移动应用 栏,点击 创建网页/移动应用 按钮,根据提示完成应用创建操作

2.获取支付所需数据
- 通过官方示例文档,获取所需接入数据 https://ideservice.alipay.com/devflow/intelliAssist/page/SC00002446?projectId=670000105#lastFinish
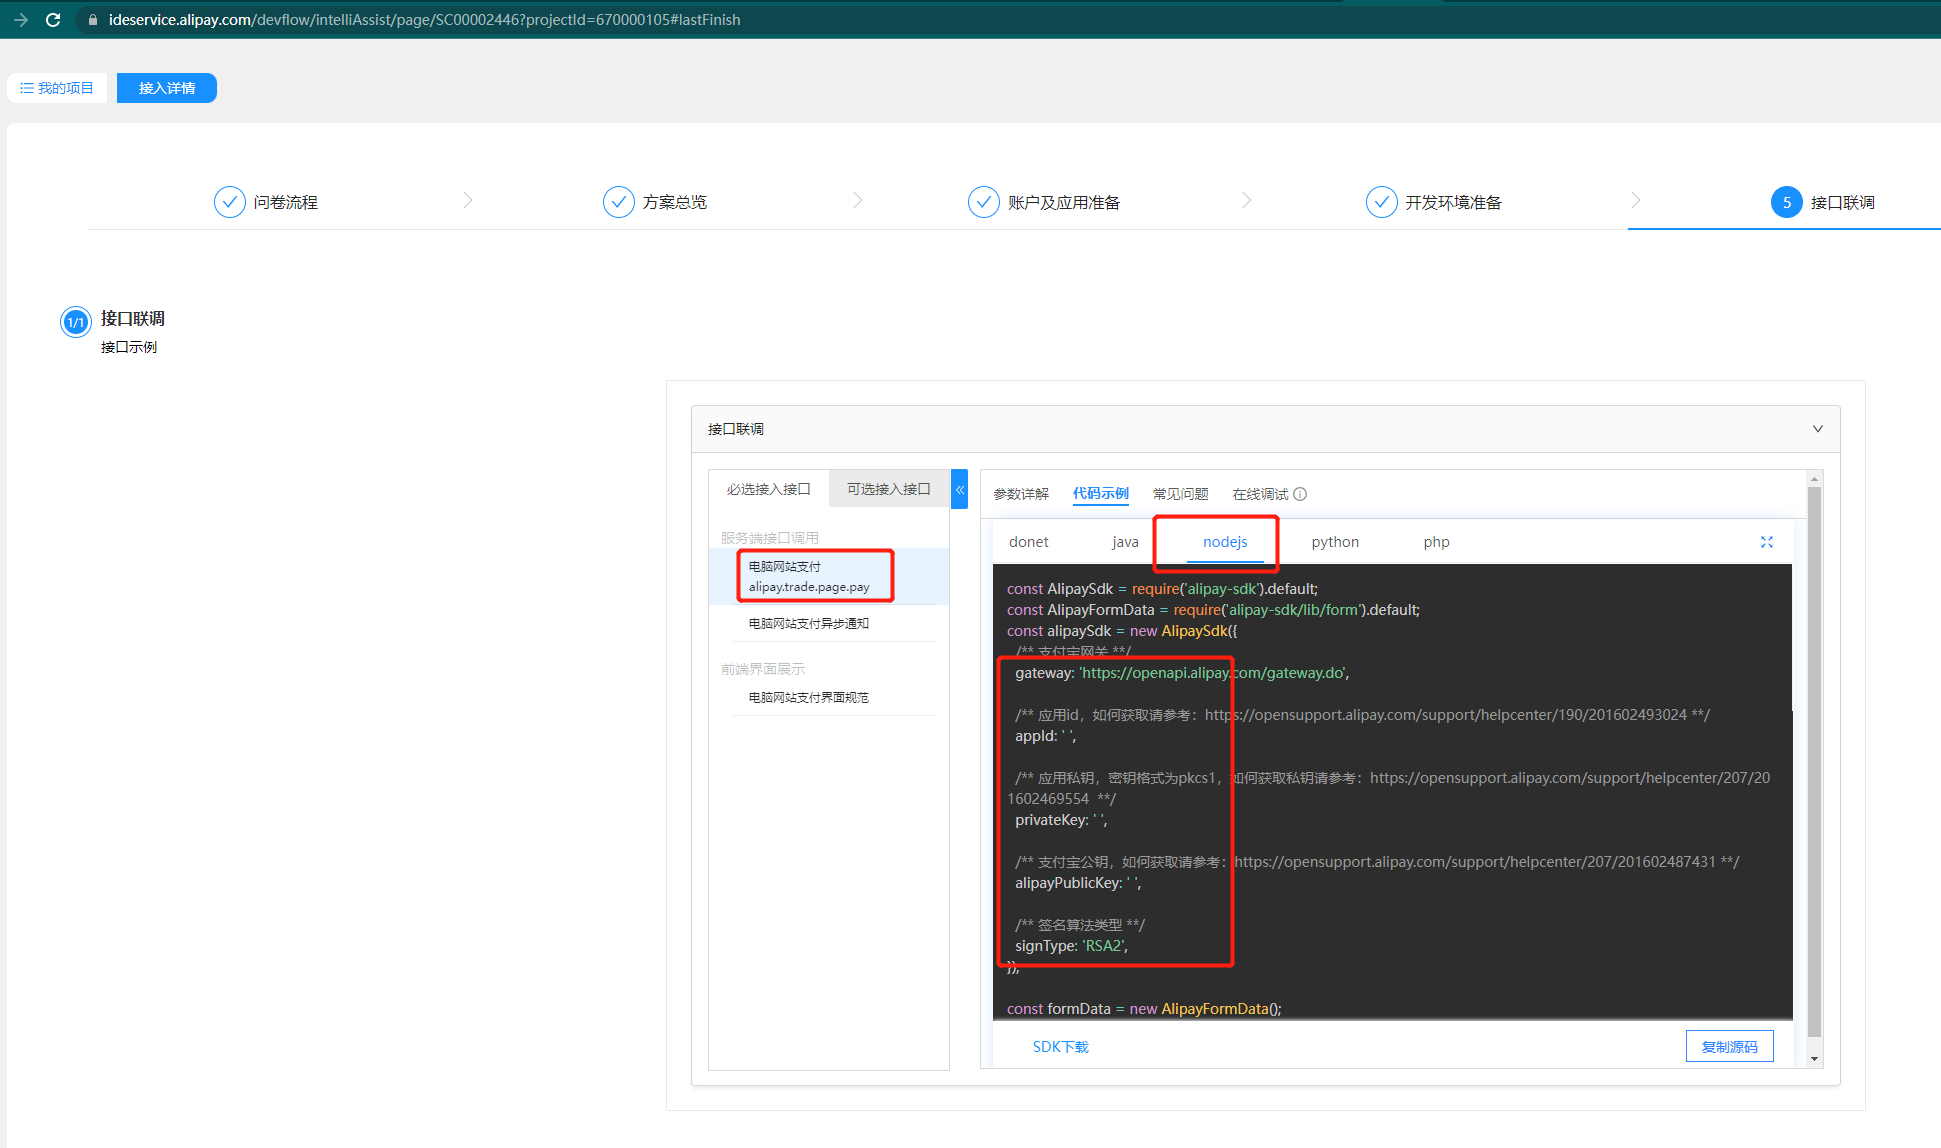
3. 检测环境是否准备充分
- 第 2 步创建完成后,通过下图步骤三-账户及应用准备 中可以检测应用是否具有正式使用的能力

4.修改对应配置文件
- 打开文件夹 src--> locales --> CN.js && EN.js && ES.js && FR.js, 将 showAliPay 字段设置为 0 或 1
#修改showAliPay
export default {
	···
	showAliPay: '0', // 是否显示支付宝支付 1 显示 0 不显示
	···
}
5. 修改 node 服务器端相关的 Alipay 参数
- 打开文件夹 DBC-NodeScript--> publicResource.js
// 修改AlipaySdk配置

export const alipaySdk = new AlipaySdk.default({
  appId: 'your appId',
  signType: 'RSA2',
  gateway: 'https://openapi.alipay.com/gateway.do',
  alipayPublicKey: 'your alipayPublicKey',
  privateKey: 'your privateKey',
});
八、单台虚拟机部署配置
1.将 node、web 更新到最新版本(重新拉取最新代码)
注意
重新拉下来的文件要在文件夹中重新执行npm install
在 node 文件夹下的HttpRequest中只需用 forever 启动router.js,TimedTask下的所有 js 文件都要启动
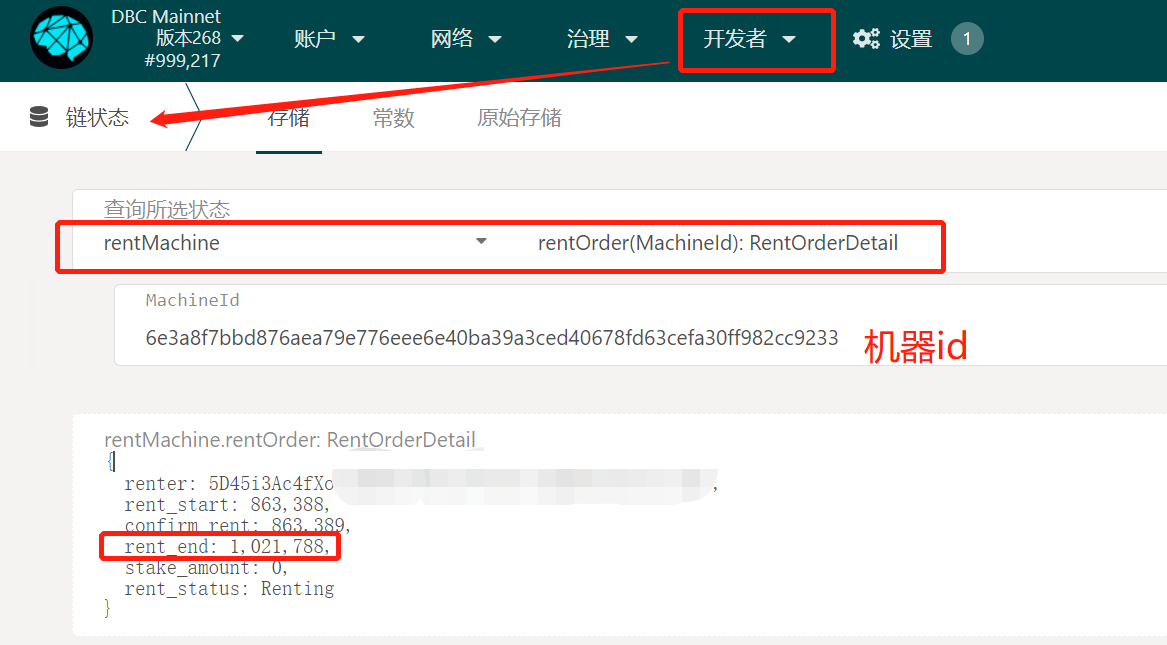
2.准备工作:
- 在链上租用一台整机(参考链接)
- 查询 session_id 信息(参考链接中的第三种类型)
- 创建网络(参考链接)
- 查看 rent_end 块高(注意获取的 rent_end 保存时要去掉逗号:1021788)
3. 将以上信息添加到数据库中:
- 设置 virMachine 集合(存储用于租用单个 GPU 的机器信息)
// virMachine集合
db.virMachine.insert({
    "_id": "virtual_machine_list",
    "machineList": [
        {
            "machine_id": "机器id",
            "session_id": "sessionid",
            "session_id_sign": "session信息",
            "rent_end": "块高",
            "network_name": "网络名称"
        },
        {
            "machine_id": "机器id",
            "session_id": "sessionid",
            "session_id_sign": "session信息",
            "rent_end": "块高",
            "network_name": "网络名称"
        }
    ]
})
九、问题总结
1.start.log 报错:map is null
- 用服务器访问地址:http://api.map.baidu.com/reverse_geocoding/v3/?ak=jQc7i76SLm2k5j54z5y6ppjWjhb0nlhC&output=json&coordtype=wgs84ll&location= (location=纬度,经度)
- 无法访问地址,执行:
echo "nameserver 8.8.4.4" | sudo tee /etc/resolv.conf > /dev/null
- ping 111.206.208.72
- ping api.map.baidu.com
- 可以 ping 111.206.208.72 但无法 ping 通 api.map.baidu.com 时,在/etc/hosts 配置:
111.206.208.72 api.map.baidu.com
2.dbc 客户端无法连接到主网
- 在安装目录下 conf/peer.conf 中添加节点:peer=116.169.53.134:5002,重启 dbc
- dbc 日志出现报错:检查端口是否开启或被占用

Loading...