DBC GPU Cloud Service English description
DBC GPU Cloud Service English description
Preface:
- The following content is only for demonstration use cases. For specific implementation, please install the appropriate software version according to your own situation, and pay attention to the relevant middleware vulnerability information in time to upgrade or repair to prevent malicious attacks.
1. Database deployment
Install & setup database
#1. Download:

  curl -O <https://fastdl.mongodb.org/linux/mongodb-linux-x86_64-3.0.6.tgz>
#2. Unzip:

  tar -zxvf mongodb-linux-x86_64-3.0.6.tgz
#3. Copy the decompressed package to the specified directory:

mkdir /data
mkdir /data/mongodb
mongodb-linux-x86_64-3.0.6/ /data/mongodb
#4. Set environment variables:

sudo echo "export PATH=/data/mongodb/bin:$PATH" >> /etc/profile
source /etc/profile
#5. Create the database directory:

  mkdir -p /data/db mkdir -p /data/db/master
#6. Create: /etc/mongod.conf Add authorization (so the database requires a password to log in)

storage:
  dbPath: /data/db/master
  journal:
enabled: true

net:
  port: 27017
  bindIp: 0.0.0.0

security:
  authorization: enabled
#7. Create admin and identifier databases and set passwords

 1) mongod --dbpath /data/db/master, then mongo
 2) use admin
 3)db.createUser({ user: "admin", pwd: "*****", roles: [{ role: "root", db: "admin" }] })
 4) db.shutdownServer()
 5) screen -S mongod
 6) mongod --config /etc/mongod.conf (the mongod.conf file needs to be configured in advance) If you want to configure automatic database backup of 2 different servers,
    Then use the command: mongod --master --slave --autoresync --config /etc/mongod.conf --source ip:27017
 7) mongo, then use admin, then db.auth('admin','******'),
 8) use identifier
 9)db.createUser({user: "dbc", pwd: "*******", roles: [ { role: "dbOwner", db: "identifier" } ]})
 10) #Set the markup rule, percentage_signle is the markup size of a single rental virtual machine, percentage_whole is the markup size of the rental machine, the parameter is followed by a number, 1 is 1%, and the example is 40%
    db.DBCPercentage.insert({ _id: 'percentage',percentage_signle: 40, percentage_whole: 50 })
 11) #to see if the setting takes effect
    db.DBCPercentage.find({}).toArray()
2.Build DBC client
#Install DBC client
Installation Environment

apt-get install libvirt-clients libvirt-daemon-system

1. Download the installation script: <https://github.com/DeepBrainChain/DBC-AIComputingNet/releases/>

Download the install_client.sh script file in it

2. Add execution permission to the install_client.sh script file: Execute on the command line: chmod +x install_client.sh

3. Run the installation script: Execute on the command line: ./install_client.sh [installation directory]

During the installation process, the user will be asked to enter 2 port numbers,for example:net_listen_port=5001,http_port=5002

#Upgrade DBC client
1. Download the upgrade script: <https://github.com/DeepBrainChain/DBC-AIComputingNet/releases/>

Download the update_client.sh script file in it

2. Add execution permission to the update_client.sh script file: Execute from the command line: chmod +x update_client.sh

3. Run the upgrade script: Execute on the command line: ./update_client.sh [original client installation directory]
3.Deploy the web environment
#Download the code to the local or server (note: the code under the master branch may be a beta version, please refer to the latest version of tags when deploying)
1. Clone the code
#Clone the code to the local or server via git clone link address https://github.com/DeepBrainChain/DBChainWebsite.git, run
git clone https://github.com/DeepBrainChain/DBChainWebsite.git

#Query all tags
git tag

#Switch tag code
git checkout <tag-name>

#Check if Node is installed, run the following command to check if Node is installed globally
node -v //v16.13.0

#After the installation is complete, open the DBChainWebsite folder and run the following command to generate the node_modules file
npm install

#After the execution is successful, run the following command to start the web page locally to run the cloud platform for testing.
npm run serve

2. Modify the cloud platform logo pattern configuration
#Open the folder src--> locales --> CN.js && EN.js && RU.js, set the website_name field to the name of your cloud platform, run it locally to view
#Modify website_name

export default {
  ···
	website_name: 'dbchain', // dbchain, 1024lab, tycloud
  ···
}

3. Configure the interface access domain name
#Open the folder src--> api --> index.js, configure the server interface configured by yourself, you can modify the node interface you belong to to access the domain name
#Modify the file, use nodeHost

const nodeHost = 'https://xxxxxx' //nodejs server address

4. Modify the access chain address
#Open the folder src--> utlis --> dot --> api.ts && index.ts , configure the access chain
const node = {
  ···
  dbc: 'wss://info.dbcwallet.io' // Official public chain
  ···
}

5. Generate a dist file to deploy the server
#Open the DBChainWebsite folder, run the following command to generate the dist folder (under the DBChainWebsite folder), put the dist folder in the specified server file, and configure nginx to specify the index.html file in the dist file to access the page
npm run build
4.Deploy Node service
#clone code

#Clone the code to the local or server through git clone link address https://github.com/DeepBrainChain/DBC-NodeScript.git
git clone https://github.com/DeepBrainChain/DBC-NodeScript.git

### deploy code

#After the code is cloned, you can use the forever plugin to create a scheduled task, run the node code in the server background, and access the corresponding interface by adding the IP address to the server port number that starts router.js.
Server installation node example: <https://www.cnblogs.com/niuben/p/12938501.html>
For example of forever deployment, please refer to: <https://blog.csdn.net/superjunjin/article/details/73252194>
(Note: After installing forever, if it is not found, you can use npm list -g --depth 0 to find the installation directory of the forever folder, enter the forever/bin/ directory and connect the forever to /usr/bin/forever for global use)
#Check if node and forever are installed successfully, execute the following commands
node -v // v16.13.0
forever --version // v4.0.1

#After the execution is correct, enter the DBC-NodeScript folder and run the following command to generate the node_modules folder under the folder
npm install

#After the execution is correct, open the publicResource.js file in the DBC-NodeScript folder and modify the relevant configuration information
export const wssChain
export const baseUrl
export const mongoUrlSeed
export const walletInfo
export const designatedWallet
#Note: mongoUrlSeed and walletInfo are encrypted strings, which need to be generated in advance, and the generation rules and methods need to contact relevant technical personnel

#Enter the DBC-NodeScript\HttpRequest folder and execute
forever start -o http-out.log -e http-err.log router.js //Start the server service of nodejs

#At this point, router.js has been mounted to the background to run, the server service is started, and the interface can be accessed at this time
nodeHost = http://xxx.xxx.xxx.xxx:8090

#Enter the DBC-NodeScript\TimedTask folder, run the js file in the folder, start the scheduled task, and update the database information in real time, for example:
forever start -o ver-out.log -e ver-err.log VerificationMachine.js
#Note: All files in the TimedTask folder must be run, otherwise the database data will not match the actual data
The following section explains the directory:
HttpRequest directory
For writing detailed interface content for interacting with the front end
api.js
- define express routes
/** * Define routes to facilitate identification of corresponding modules * Export the routing module, reference it in the router.js file */ export const Select = express.Router()- Create a route corresponding interface
Select.get('/', (request, response , next) => {
    ******
    Call the database, process and return the data
    ******
})
router.js
- Define request information
- set request headers
/** * Import the routing module in api.js * Set the request header and start the server service */ // use router serve.use('/api/select', Select)- start the server service
serve.listen(8090, ()=>{
    console.log('Server startup completed');
})
TimedTask directory
- Used to create a js file that only interacts with the database, and regularly request data to be stored in the database, so that the data can be updated in time
testScript directory
- Used to create node executable scripts for testing purposes only
publicResource.js
- For public basic information configuration, pay attention to modify
/**
 * wssChain call chain name
 */
export const wssChain = {
  dbc: 'wss://info.dbcwallet.io'
}

/**
 * baseUrl c++ port
 */
export const baseUrl = '<http://ip:5002>' // The dbc client ip and port number in step 3

/**
 * Connect to mongo database
 */

export const mongoUrlSeed = 'ba22370884954c456be7fc10cbae7a652fbadfb64e4ab9aab4a8a944f1f8ea052abc8968bfdb05ac1dc0f0842872089e' // Server access mongo encrypted field

/**
 * Wallet data
 */
export const walletInfo = '16c2efe71e094d0b3dd7b319da9c6a636cc0c7740cb6e900a40220fc3b77ec8f22a99f79' // Server access wallet encryption field

/**
 * Define a wallet for renting a machine for income
 */
export const designatedWallet = '5F7L9bc3q4XdhVstJjVB2o7S8RHz2YKsHUB6k3uQpErTmVWu' // The dbc revenue part paid
//by the user will enter this wallet, which needs to be replaced with your own wallet address
5.Deploy Nginx service
# Install Nginx
sudo apt install nginx -y

# configure nginx
mkdir /etc/nginx/gpucloud //Upload the ssl certificate to this folder
mkdir /etc/nginx/gpucloud.conf
sudo vim /etc/nginx/gpucloud.conf

#The example is as follows, please change it according to your own environment, for reference only
# If it is two hosts, please do load balancing

server{

        listen 443;
        server_name nodejs.xxxx.xxxx;
        ssl on;

        ssl_certificate   cert/gpucloud/example.crt;
        ssl_certificate_key  cert/gpucloud/example.key;
        ssl_session_timeout 5m;
        ssl_ciphers ECDHE-RSA-AES128-GCM-SHA256:ECDHE:ECDH:AES:HIGH:!NULL:!aNULL:!MD5:!ADH:!RC4;
        ssl_protocols TLSv1 TLSv1.1 TLSv1.2;
        ssl_prefer_server_ciphers on;

        location / {

        proxy_pass http://ip:8090; #nodejs server ip and port
        proxy_set_header   Host             $host;
                         proxy_set_header   X-Real-IP        $remote_addr;
                         proxy_set_header   X-Forwarded-For  $proxy_add_x_forwarded_for;


        }


    }


server {
         listen 80;
        server_name nodejs.xxxx.xxxx;

        location / {

         proxy_pass http://ip:8090; #nodejs server ip and port
        proxy_set_header   Host             $host;
                         proxy_set_header   X-Real-IP        $remote_addr;
                         proxy_set_header   X-Forwarded-For  $proxy_add_x_forwarded_for;

        }


    }

server{

        listen 443;
        server_name dbcnode.xxxx.xxxx;
        ssl on;

        ssl_certificate   cert/gpucloud/example.crt;
        ssl_certificate_key  cert/gpucloud/example.key;
        ssl_session_timeout 5m;
        ssl_ciphers ECDHE-RSA-AES128-GCM-SHA256:ECDHE:ECDH:AES:HIGH:!NULL:!aNULL:!MD5:!ADH:!RC4;
        ssl_protocols TLSv1 TLSv1.1 TLSv1.2;
        ssl_prefer_server_ciphers on;

        location / {

        proxy_pass http://ip:5002; #dbc client node ip and port
        proxy_set_header   Host             $host;
                         proxy_set_header   X-Real-IP        $remote_addr;
                         proxy_set_header   X-Forwarded-For  $proxy_add_x_forwarded_for;


        }


    }


server {
         listen 80;
        server_name dbcnode.xxxx.xxxx;

        location / {

        proxy_pass http://ip:5002; #dbc client node ip and port
        proxy_set_header   Host             $host;
                         proxy_set_header   X-Real-IP        $remote_addr;
                         proxy_set_header   X-Forwarded-For  $proxy_add_x_forwarded_for;

        }


    }


server {
         listen 443;
        server_name www.xxxx.xxx; #gpu cloud website url
        ssl on;

        ssl_certificate   cert/gpucloud/example.crt;
        ssl_certificate_key  cert/gpucloud/example.key;
        ssl_session_timeout 5m;
        ssl_ciphers ECDHE-RSA-AES128-GCM-SHA256:ECDHE:ECDH:AES:HIGH:!NULL:!aNULL:!MD5:!ADH:!RC4;
        ssl_protocols TLSv1 TLSv1.1 TLSv1.2;
        ssl_prefer_server_ciphers on;

        location / {

            root /data/dbc-website;
            try_files $uri $uri/ /index.html;
           index index.html index.htm;

        }
        location = /50x.html {
            root html;
        }
        error_page 500 502 503 504  /50x.html;

    }

server {
         listen 443;
        server_name xxxx.xxx; #gpu cloud website url ,no include www
        ssl on;

        ssl_certificate   cert/gpucloud/example.crt;
        ssl_certificate_key  cert/gpucloud/example.key;
        ssl_session_timeout 5m;
        ssl_ciphers ECDHE-RSA-AES128-GCM-SHA256:ECDHE:ECDH:AES:HIGH:!NULL:!aNULL:!MD5:!ADH:!RC4;
        ssl_protocols TLSv1 TLSv1.1 TLSv1.2;
        ssl_prefer_server_ciphers on;

        location / {

            root /data/dbc-website;
            try_files $uri $uri/ /index.html;
            index index.html index.htm;

        }
        location = /50x.html {
            root html;
        }
        error_page 500 502 503 504  /50x.html;

    }


server {
        listen 80;
        server_name xxxx.xxx;
        return 301 http://www.xxxx.xxx$request_uri;
}


server {
        listen 80;
        server_name www.xxxx.xxx;
        rewrite ^(.*)$ https://${server_name}$1 permanent;

       }


# Check if Nginx is configured correctly
sudo nginx -t

# start and set the boot time
sudo nginx -s reload
sudo systemctl start nginx
sudo systemctl enable nginx
6.Paypal related documents
Register a Paypal account
- Register a Paypal account (individual companies are not limited) https://www.paypal.com/c2/home
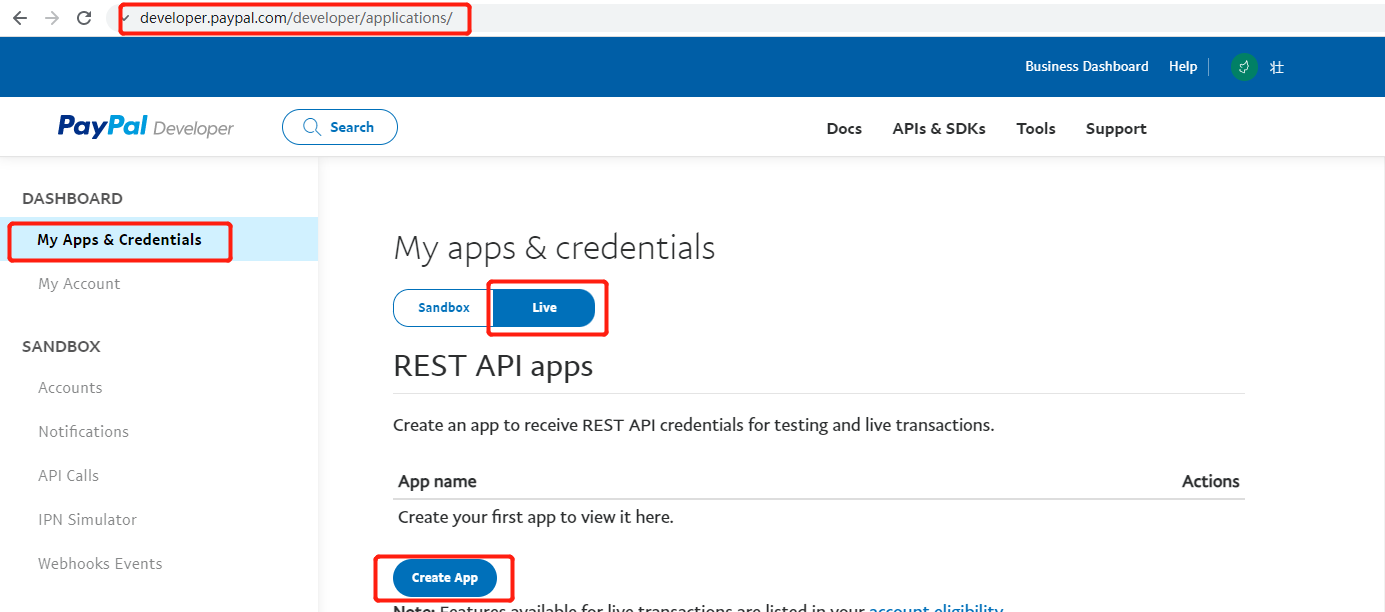
- Login to paypal developer website https://developer.paypal.com/developer/applications/
Get Client ID and Secret
- Go to the developer page, as shown below, select the Live option, click the Create App button, and create an application to receive REST API credentials for testing and live transactions.
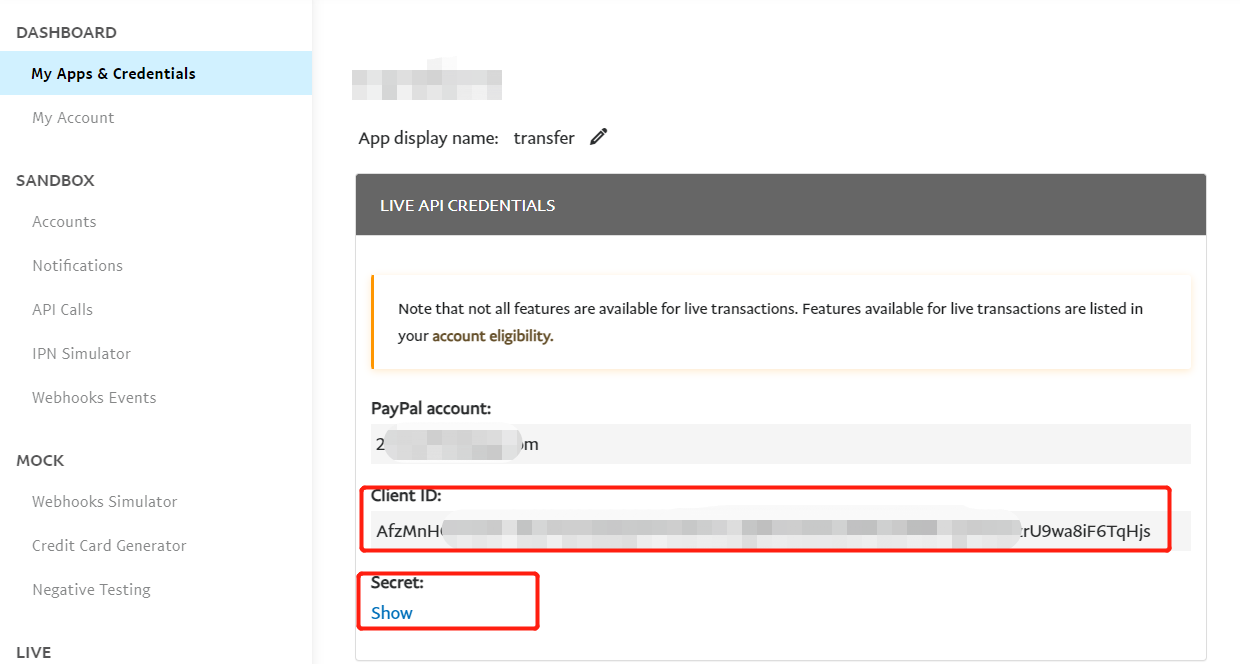
- Create an App according to the prompts on the page. After the operation is completed, you will generate your own App, as shown in the figure below, you can view your Client ID & Secret
Modify the relevant Paypal parameters in the cloud platform
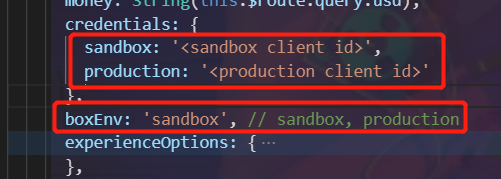
Open the folder src--> views --> trade_io --> buy_3.vue, modify the fields in it, where sandbox is the sandbox beta version, and production is the official online version
// Modify credentials, boxEnv

// Fill in the Client ID obtained in step 2
credentials: {
    sandbox: '<sandbox client id>', // Sandbox beta version, on the official environment, you can leave this option blank
    production: '<production client id>'  // On the official version, the official environment is required.
},
boxEnv: 'sandbox', // Sandbox Beta: sandbox, Production: production
Modify the Paypal parameters related to the node server
Open the folder DBC-NodeScript-->publicResource.js
// Modify paypalUrl
/**
 * paypal access domain name
 */
 export const paypalUrl = 'https://api-m.sandbox.paypal.com' // Sandbox beta version
// export const paypalUrl = 'https://api-m.paypal.com' // official version
Database configuration
- Set up the contractwallet collection (storing the contract wallet address and private key for transfer)
- Set paypalInfo collection (store CLIENT_ID and SECRET required for paypal query)
// contractwallet collection
db.contractwallet.insert({
    _id:'contractwallet', // Cannot be modified, fixed _id is 'contractwallet'
    "wallet":'your wallet', // Wallet address for transfer
    "seed":'your seed' // The wallet address private key used for transfer
})

// paypalInfo collection
db.paypalInfo.insert({
    _id:'paypal', // Cannot be modified, fixed _id is 'paypal'
    "Client_ID":'your Client_ID', // Client_ID corresponding to your app
    "Secret":'your Secret' // Secret corresponding to your app
})
7、Alipay related documents
1.Log in to Alipay developer platform
- Open Alipay Open Platform - Console https://open.alipay.com/develop/manage
- Select the webpage/mobile application column, click the Create webpage/mobile application button, and follow the prompts to complete the application creation operation

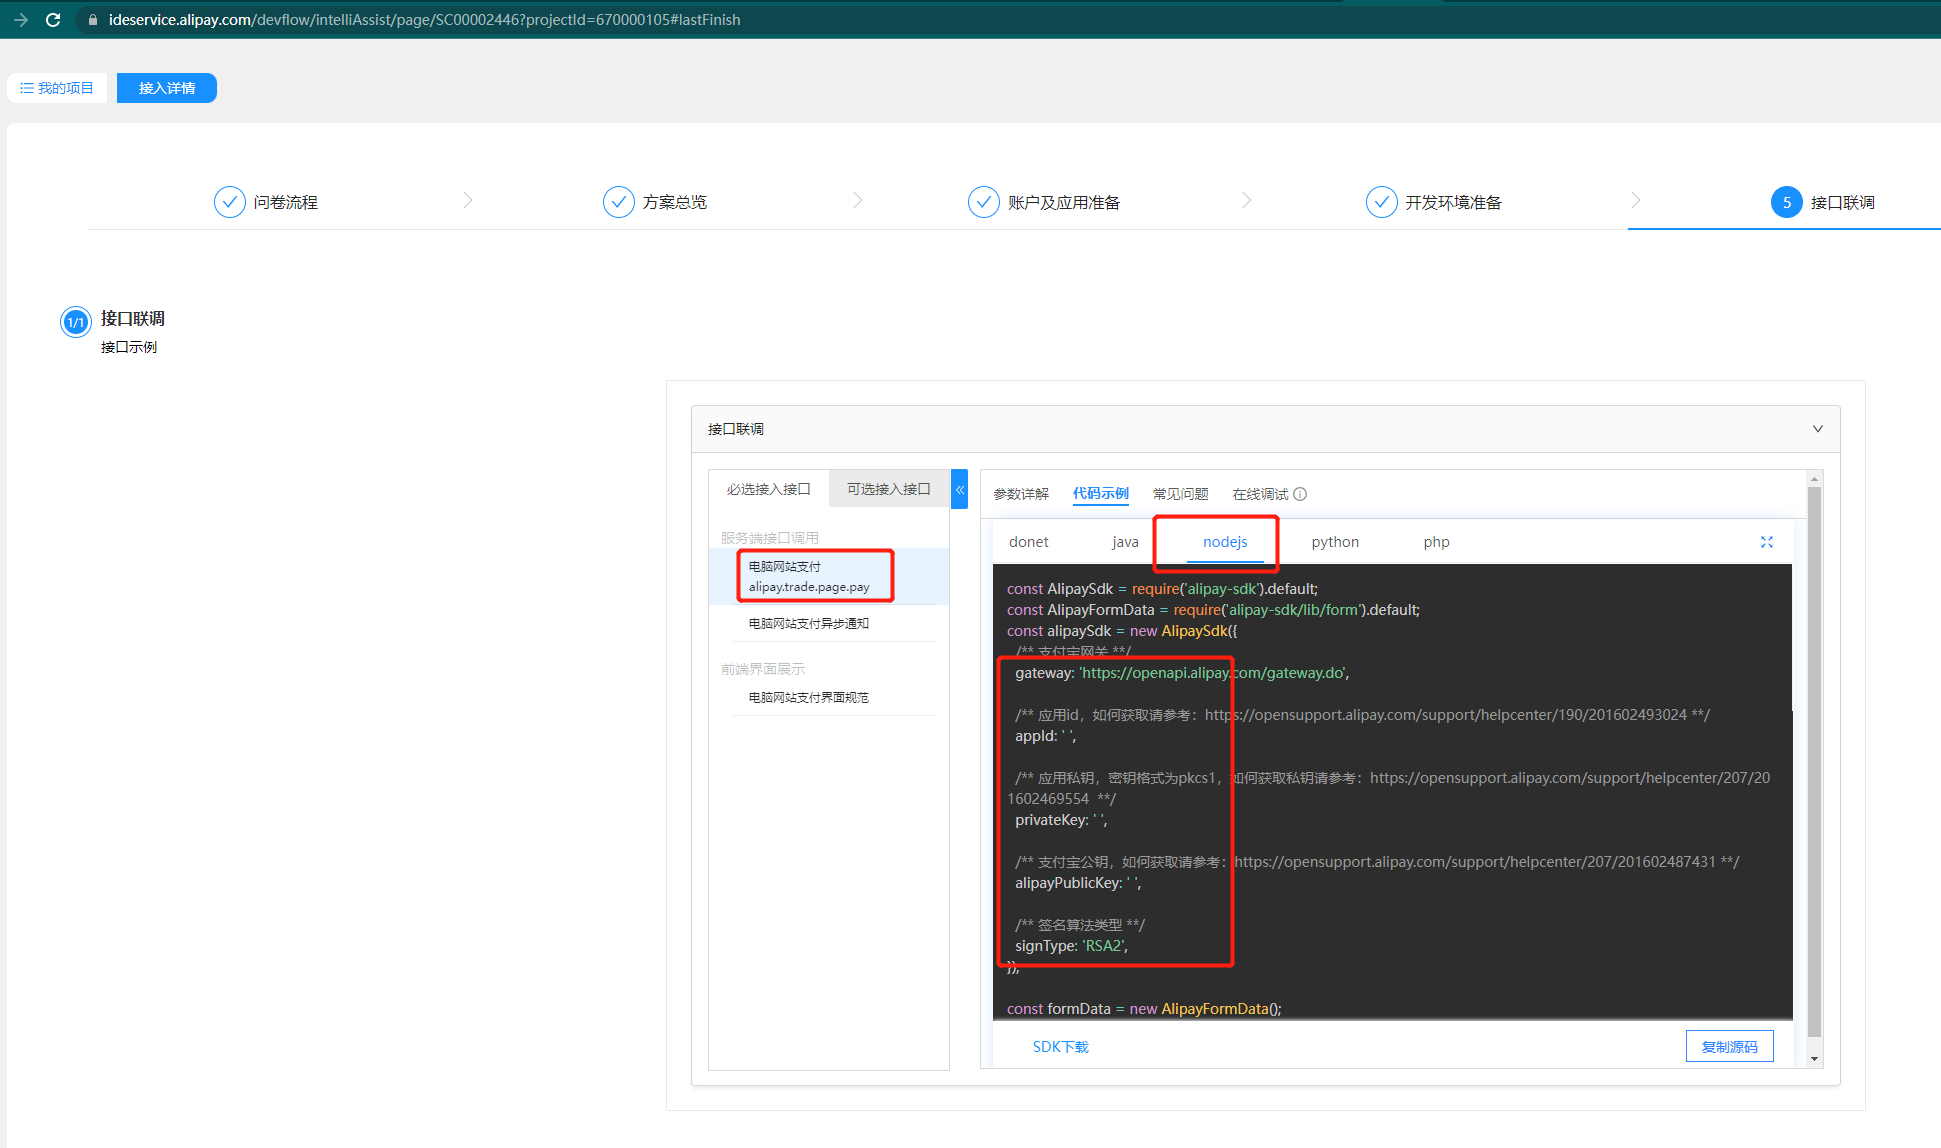
2.Get the data required for payment
- Obtain the required access data through the official sample document https://ideservice.alipay.com/devflow/intelliAssist/page/SC00002446?projectId=670000105#lastFinish
3. Check if the environment is well prepared
- After the creation of step 2 is completed, you can check whether the application has the ability to be officially used through step 3 - account and application preparation in the following figure

4.Modify the corresponding configuration file
- Open the folder src--> locales --> CN.js && EN.js && ES.js && FR.js, set the showAliPay field to 0 or 1
#modifyshowAliPay
export default {
	···
	showAliPay: '0', // Whether to display Alipay payment 1 display 0 not display
	···
}
5. Modify the Alipay parameters related to the node server
- Open the folder DBC-NodeScript-->publicResource.js
// Modify AlipaySdk configuration

export const alipaySdk = new AlipaySdk.default({
  appId: 'your appId',
  signType: 'RSA2',
  gateway: 'https://openapi.alipay.com/gateway.do',
  alipayPublicKey: 'your alipayPublicKey',
  privateKey: 'your privateKey',
});
8. Lease a single virtual machine
Update node and web to the latest version (re-pull the latest code)
注意
The re-pulled files need to be re-executed npm install in the folder
In the HttpRequest under the node folder, just use forever to start router.js, and all js files under TimedTask must be started
Preparation:
Rent a whole machine on the chain (Reference link)
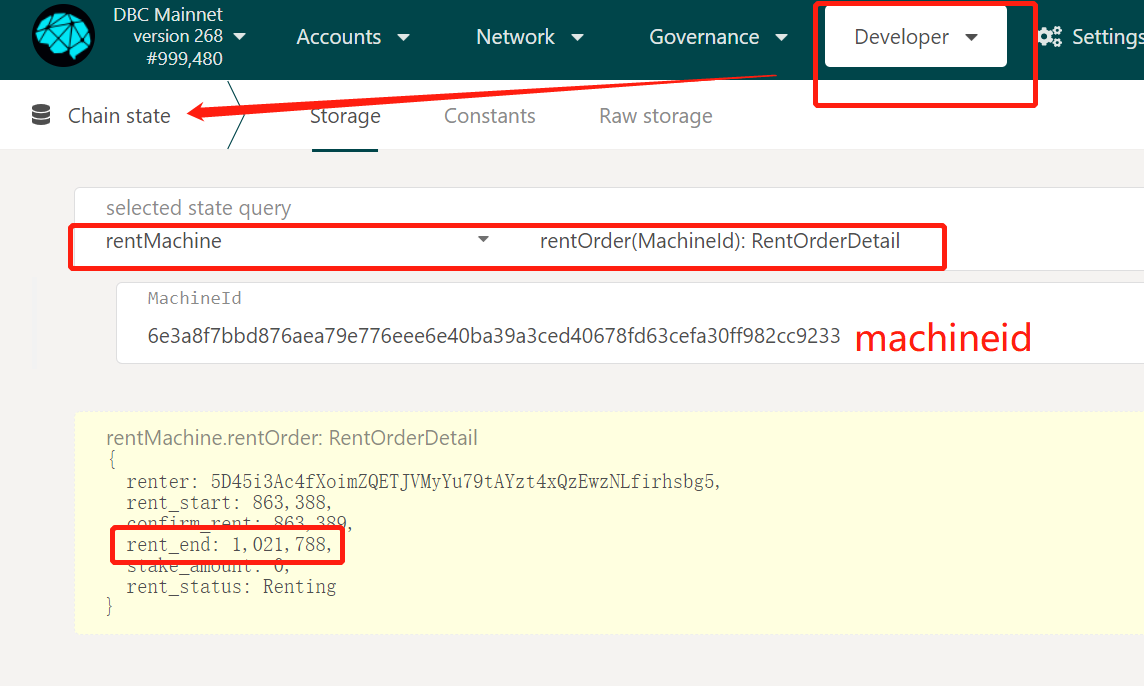
Query session_id information (The third type in the reference link)
Create network (Reference link)
View rent_end block height(Note that the comma should be removed when the obtained rent_end is saved: 1021788)
Add the above information to the database:
- Set up a virMachine collection (stores machine information for renting a single GPU)
// virMachine Collection
db.virMachine.insert({
    "_id": "virtual_machine_list",
    "machineList": [
        {
            "machine_id": "machine_id",
            "session_id": "sessionid",
            "session_id_sign": "session_id_sign",
            "rent_end": "block height",
            "network_name": "network name"
        },
        {
            "machine_id": "machine_id",
            "session_id": "sessionid",
            "session_id_sign": "session_id_sign",
            "rent_end": "block height",
            "network_name": "network name"
        }
    ]
})
9. Summary of the problem
1.start.log reports an error: map is null:
- Access address with server:http://api.map.baidu.com/reverse_geocoding/v3/?ak=jQc7i76SLm2k5j54z5y6ppjWjhb0nlhC&output=json&coordtype=wgs84ll&location= (location=latitude, longitude)
- Unable to access address, execute:
echo "nameserver 8.8.4.4" | sudo tee /etc/resolv.conf > /dev/null
- ping 111.206.208.72
- ping api.map.baidu.com
- Can ping 111.206.208.72 but can't ping api.map.baidu.com,Configure in /etc/hosts:
111.206.208.72 api.map.baidu.com
2.The dbc client cannot connect to the mainnet
- Add a node to conf/peer.conf in the installation directory: peer=116.169.53.134:5002, restart dbc
- Error in dbc log: check whether the port is open or occupied
